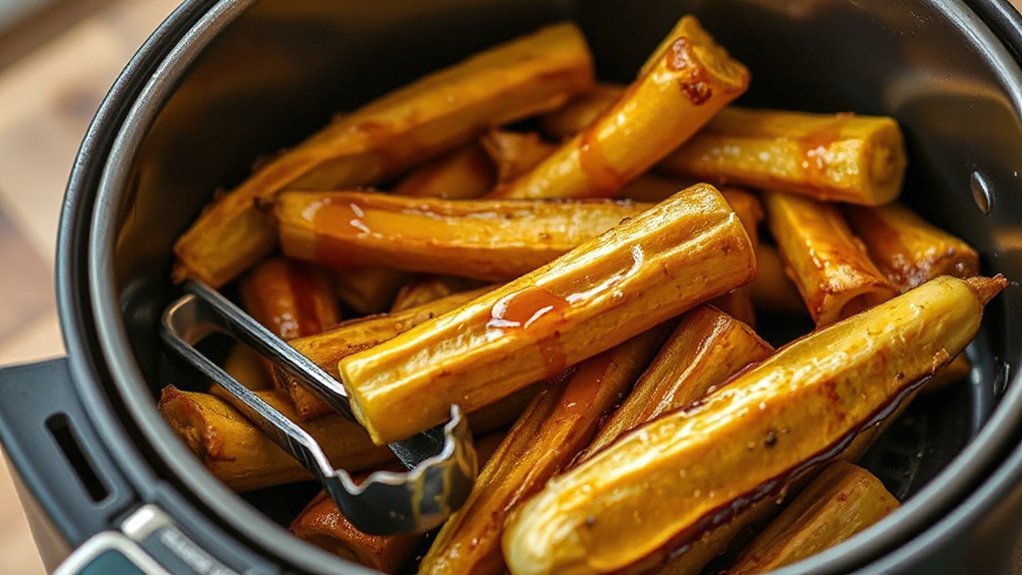
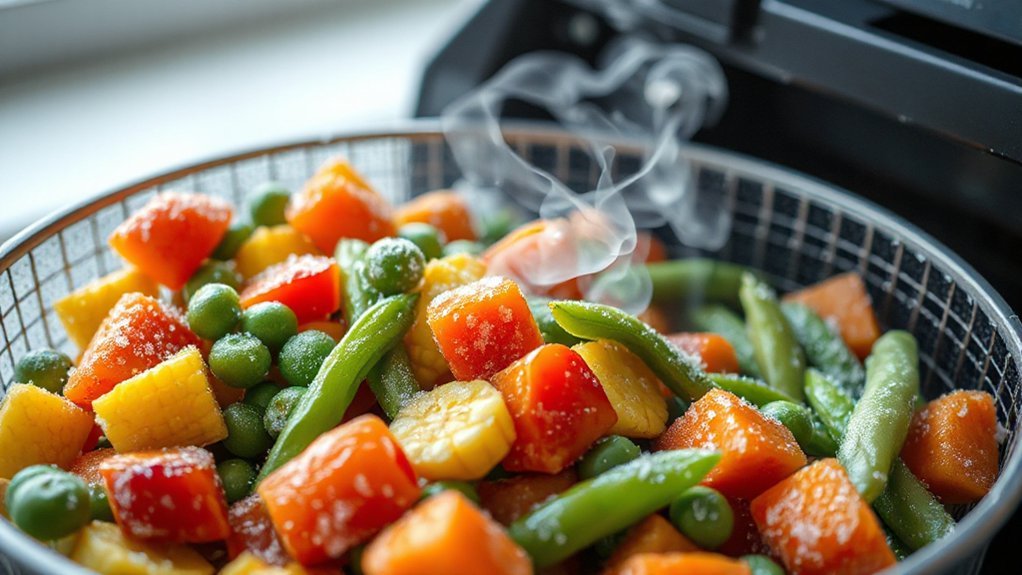
You’ll turn simple parsnips into sticky, caramelized bites with your air fryer now. Cut one to one-and-a-half pounds into uniform pieces, toss with olive oil, salt and pepper, then air-fry at 380–400°F until tender and golden, about 12–18 minutes, shaking once. Warm honey with a squeeze of lemon and knob of butter, toss with the hot parsnips, then give them a quick high-heat blast to glaze. Keep going for tips on timing, swaps and serving.
Ingredients
Grab 1–1.5 lb of parsnips, a couple tablespoons of olive oil, salt and pepper, and any herbs or spices you like—thyme, rosemary, smoked paprika, or a pinch of cumin work great. You’ll want a little honey for glaze, a squeeze of lemon or splash of apple cider vinegar to brighten, and optional butter for richness. Keep kosher or vegan swaps in mind: use maple instead of honey, vegan butter instead of dairy, and swap oil types. These Ingredient substitutions are simple and let you tweak Flavor profiles from sweet and citrusy to smoky and earthy. For a spicy kick add cayenne or chili flakes; for nuttiness toss with toasted sesame oil at the end. Measure roughly so you don’t overcoat parsnips; you’re aiming for a light shimmer of oil and a tablespoon or two of honey. Salt last if you’re using salty toppings like parmesan or soy-based sauces.
Equipment
Now that you’ve seasoned and coated the parsnips, you’ll want the right gear to get them crisp without fuss. Use a medium air fryer with a reliable basket that lets hot air circulate; a perforated tray or wire rack is ideal for even browning. Keep a sturdy pair of tongs, a silicone spatula, and an oil mister handy for quick turns and light glazing. Consider Accessory Choices like a nonstick liner or mesh basket for easy cleanup, and a compact digital probe thermometer if you like exact timing. You’ll also want a small bowl for the honey glaze and a heatproof brush. Don’t forget a silicone trivet to protect surfaces. For longevity, follow Routine Maintenance: wipe down the basket after each use, soak removable parts when needed, and check seals and fans periodically. With these tools, you’ll finish faster and keep your fryer performing great. and tasting amazing
Preparing the Parsnips
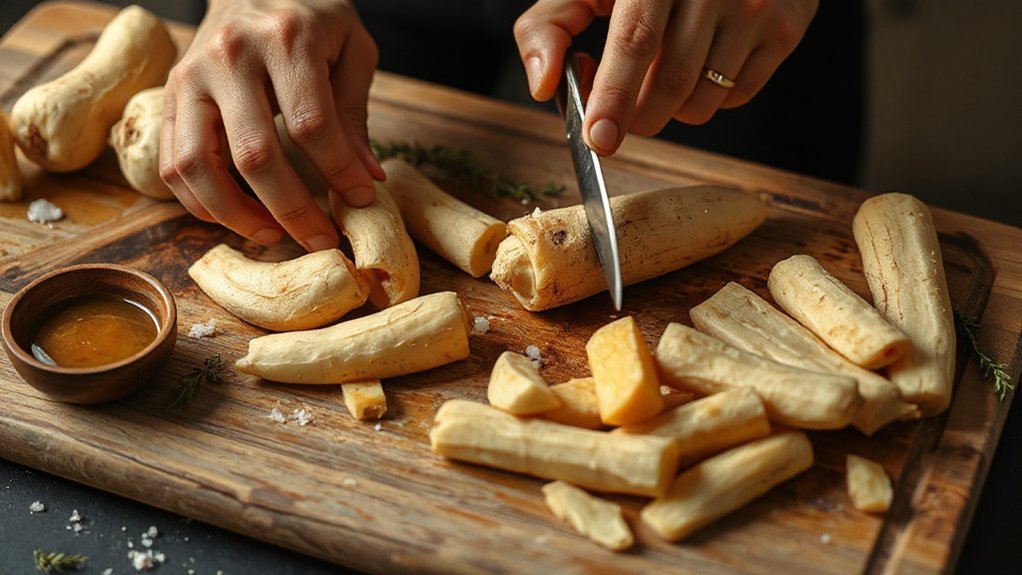
You’ll want firm, straight parsnips with pale skin and minimal browning—avoid limp or woody roots. Rinse them under cold water and give any dirt in the crevices a good scrub. Peel them only if the skin’s thick or bitter, leave thinner ones unpeeled for texture, and trim the ends.
Selecting Parsnips
How do you pick parsnips that’ll roast up sweet and tender in the air fryer? Look for firm, smooth roots without soft spots or excessive branching; small to medium parsnips concentrate sweetness and brown better. Note pale cream color—avoid green-tinged or shriveled specimens. Taste expectations vary by variety, so consider flavor profiles: baby parsnips are milder and nutty, mature roots deliver deeper caramel notes. Buy with seasonal availability in mind—parsnips improve after light frost, so fall and winter crops tend to be sweeter and more affordable. Smell them briefly; they should be fresh, earthy, not sour. If you’ll store them, choose unblemished, dense roots and keep them cool and dry. That selection sets you up for a perfect honey-glazed finish. Enjoy the flavor boost.
Washing and Peeling


Starting with a quick rinse and scrub will save you time in the air fryer—hold each parsnip under cold running water and use a vegetable brush to remove soil from crevices, then trim the tops and any forked bits with a sharp knife. Next, decide whether to peel: thin-skinned young parsnips keep more texture, while mature roots often need peeling to avoid bitterness. If you peel, use a swivel peeler and remove only the outer layer to preserve flesh and maximize nutrient retention. Pat parsnips dry with a clean towel so seasonings stick and avoid steaming in the basket. Cut into uniform pieces for even cooking. Quick soil removal and careful peeling set you up for caramelized, tender results. You’ll love the flavor indeed.
Air Fryer Cooking Instructions
Preheat your air fryer to 380–400°F so the parsnips start crisping the moment they hit the basket, and plan about 12–18 minutes depending on thickness. Don’t crowd the basket—you’ll get steam instead of crispness, so work in single layers and cook in batches if needed. Shake or flip halfway and adjust a few minutes up or down for larger or smaller pieces, keeping finished batches warm on a rack while the rest cook.
Preheat & Timing Tips
Because air fryers heat fast, you’ll get the best texture if you run yours empty for 2–3 minutes at 380–400°F (190–200°C) before adding the parsnips. Start timing once the parsnips are in and the basket’s moving; aim for 12–16 minutes total, shaking or flipping at the halfway point for even caramelization. If your pieces are thicker, add a couple minutes; thinner pieces need less. Note the preheat duration on your model — some skip long warmups, others need three minutes. For Cold starts, expect the lower end of the time range while the unit ramps up. Use a quick probe to check doneness: tender center, crisp edges. Adjust based on size, desired brownness, and your specific air fryer behavior. Note settings and modify accordingly.
Batching and Crowding
If you crowd the basket, you’ll end up steaming instead of crisping—so work in single layers with space between pieces. Think of batch logistics like a tiny assembly line: do one neat layer, finish, then reload. Don’t eyeball capacity; do quick capacity planning by measuring how many parsnip sticks fit without overlap. If you’re serving a crowd, cook multiple short batches rather than overfilling and losing texture. Keep a warm oven or covered tray to hold finished batches while others cook. Flip or shake each batch halfway for even browning. You’ll get consistent caramelized edges and tender centers when you respect space and timing—it’s simple, fast, and makes every batch taste like the best one, and saves you time while maximizing flavor every time.
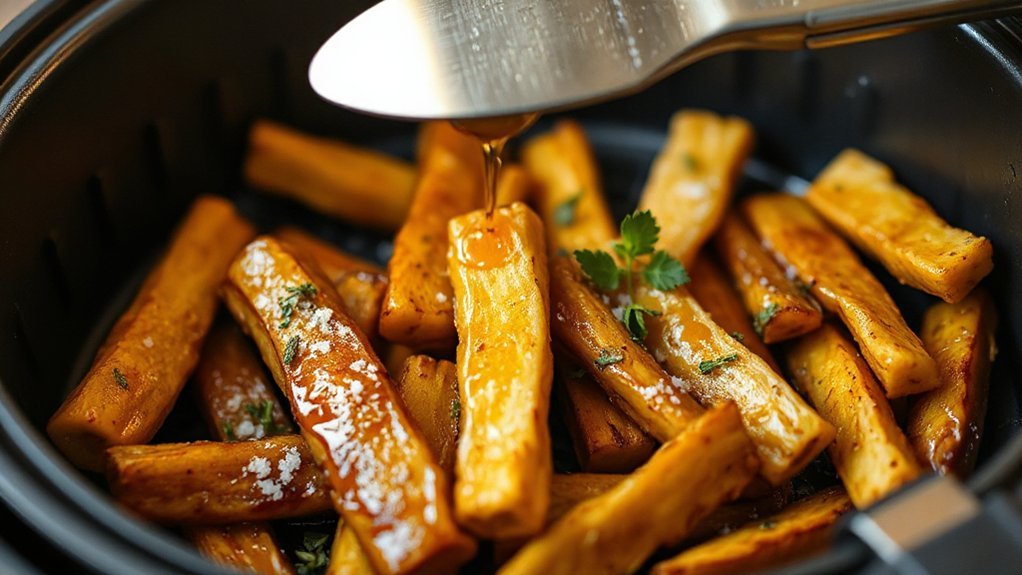
Honey Glaze and Finishing
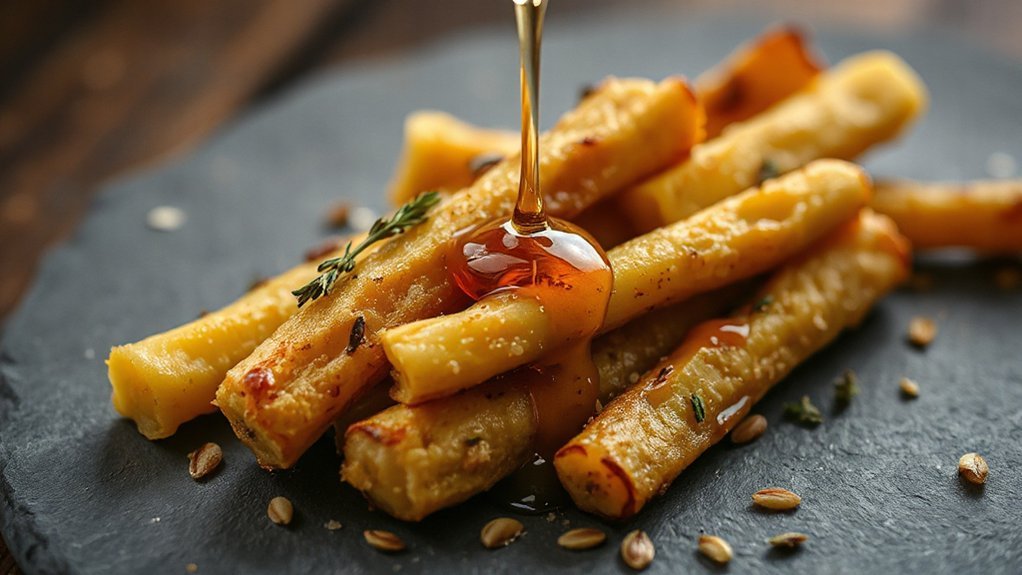
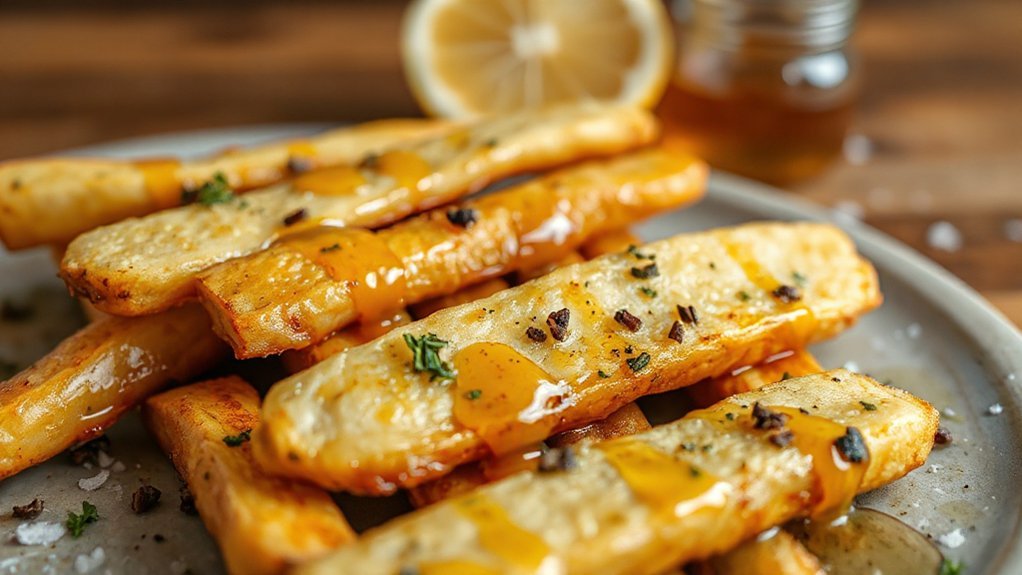
When the parsnips are golden and just tender, toss them with a warm honey glaze so it clings and caramelizes without burning. You’ll want to work quickly: warm the honey with a splash of butter, a squeeze of lemon and a pinch of salt to balance sweetness. Check glaze viscosity—too thick and it won’t coat evenly; thin it with water or lemon until it ribbons off a spoon. For caramelization control, hit the parsnips with a brief high-heat blast in the air fryer or under the broiler for 1–2 minutes, watching closely so sugars don’t blacken. Use tongs to flip halves and redistribute glaze so every surface glistens. Let them rest a minute so the glaze sets and becomes slightly tacky. Finish with a light grind of pepper or flaky salt and avoid overcrowding the platter while they’re still hot. You’ll get glossy, not soggy, perfectly finished parsnips.
Serving Suggestions and Pairings

How will you serve these honey-glazed parsnips so they shine on the plate? Plate them warm atop a smear of herbed yogurt or creme fraiche, sprinkle toasted pistachios and a squeeze of lemon to cut sweetness. For weeknight dinners, tuck them next to roasted chicken or glazed salmon — these protein matches lift simple mains. When you’re after a crowd-pleaser, scatter chopped parsley, crumbled feta, and pomegranate arils for color and brightness. Think about wine pairings: a crisp unoaked Chardonnay or dry Riesling balances honeyed richness without overpowering. For heartier menus, choose Pinot Noir or a light Grenache. Use the parsnips as a composed side on a holiday platter, or serve alongside grain bowls with farro, arugula, and a tangy vinaigrette. Keep textures varied — creamy, crunchy, acidic — and match flavors deliberately. These tips help your sweet air fryer parsnips feel intentional, not afterthought. And plated now.
Make-Ahead and Storage
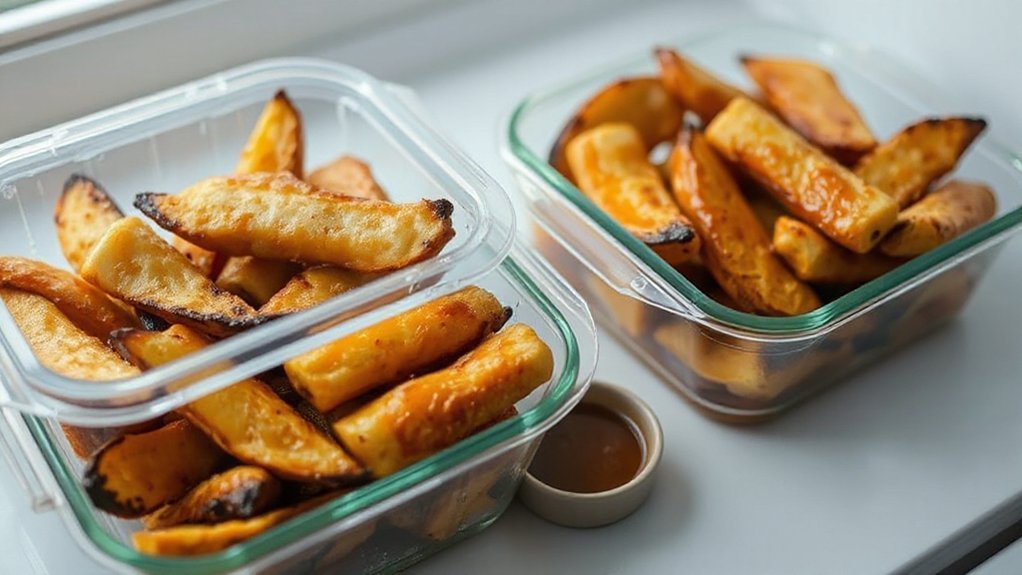
While you’re prepping ahead, know these honey-glazed parsnips hold up nicely and can save you time without losing texture.
| Storage | Time |
|---|---|
| Fridge | 4 days |
| Freezer | 2–3 months |
| Prep | Day ahead |
Cool completely, then refrigerate in an airtight container. Reheat in the air fryer at 350°F for 3–5 minutes to crisp. For longer storage, flash-freeze on a tray, transfer to freezer bags, and follow Freezer Instructions: remove as much air as possible. Thaw overnight in the fridge, then reheat. Use Labeling Dates on each bag so you rotate stock. If you’re prepping for a gathering, roast and glaze a day ahead; finish crisping before serving. Pack chilled parsnips into shallow containers to cool faster and avoid sogginess. When you bring them back, don’t overcrowd the basket—give pieces room to re-crisp. They reheat beautifully and taste fresh again. Store single servings for easy plating and quicker reheating on busy days.
Tips and Troubleshooting
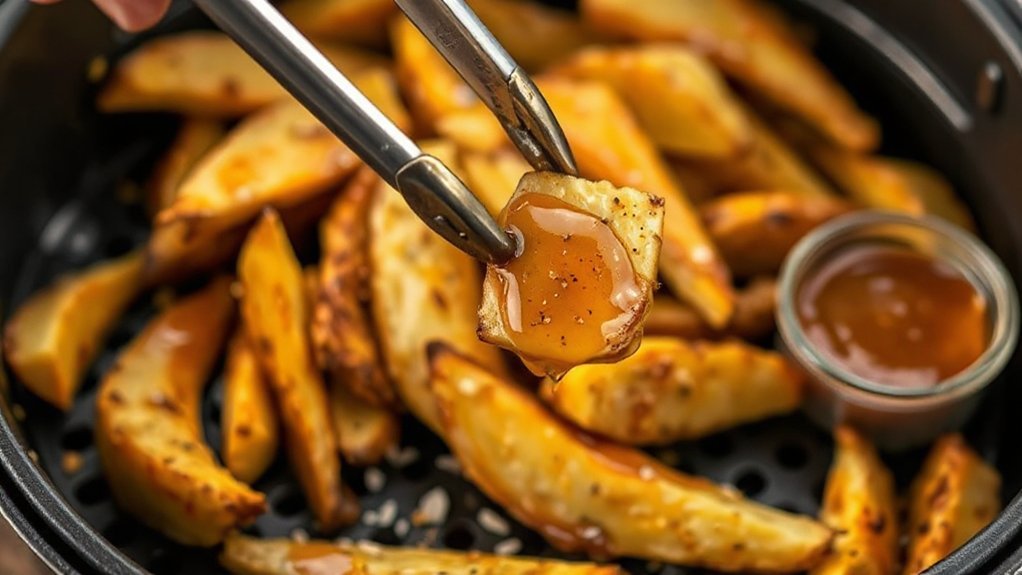
You’ve got storage and reheating down, so let’s tackle common snags that can steal the shine from your honey-glazed parsnips. If they come out soggy, don’t overcrowd the basket; give pieces space for hot air to circulate and you’ll get crisp edges. If the glaze burns, lower temperature five to ten degrees and finish with a quick blast of air-fry for color. For uneven cooking, cut parsnips into uniform sizes and shake basket halfway through. Smoke mitigation: trim away excess oil and wipe drips from the tray, and run the fryer empty at 400°F for a few minutes after heavy use. To fight lingering smells, use a lemon-water cycle or vinegar wipe for odour removal, and leave the drawer open to air dry. If you spot bitterness, choose fresher parsnips and blanch briefly. Keep a timer and you’ll avoid most mishaps. Practice makes perfect; taste and adjust often.
Conclusion
You’ll love how these honey‑glazed parsnips crisp in the air fryer and taste like sunshine on your plate. They’re effortless, forgiving, and perfect for weeknights or a dinner that impresses without stress. Make extra — you’ll thank yourself. Reheat gently and they’ll still sing. Serve with something green, squeeze of lemon, and maybe a sprinkle of nostalgia, like a Viking dining with a smartphone in hand, reminding you this underrated veggie belongs at every table.