
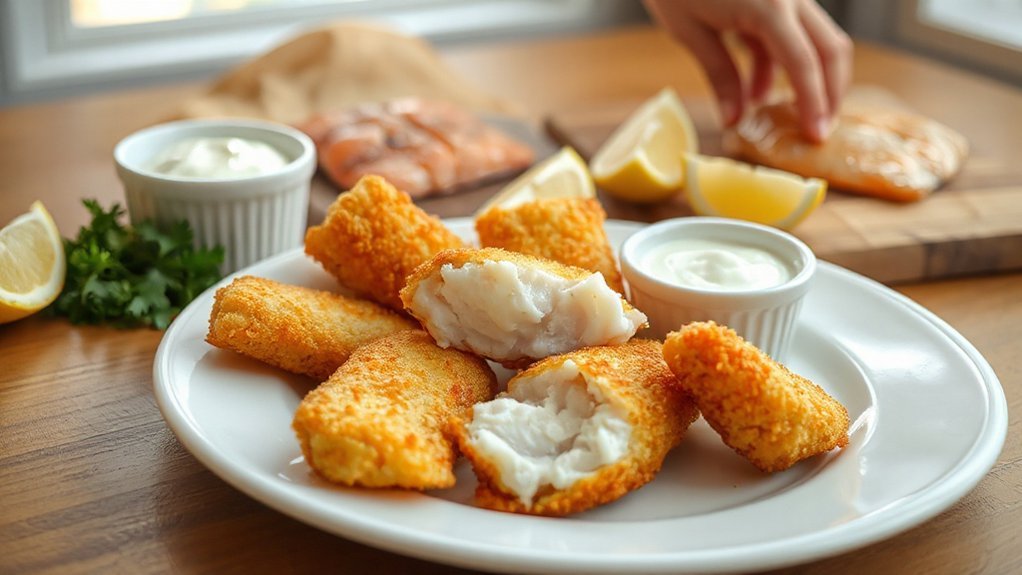
You can make crispy, kid-approved fish sticks in your air fryer that beat frozen packs on taste, texture and nutrition. Use firm white fish like cod or pollock, pat it dry, cut into uniform sticks, then triple-coat with seasoned flour, egg and panko (or half-panko/whole-grain swap). Preheat to 400°F, air-fry 8–12 minutes flipping once; finish with a light oil mist. They freeze and reheat beautifully — keep going for tips, timing and sauces, and serving ideas.
Ingredients and Portions

You’ll need about 1 pound of firm white fish (like cod or haddock) to make 4 servings of crispy air fryer fish sticks; toss in 1 cup of panko breadcrumbs, 1/2 cup of flour, 2 beaten eggs, and seasonings (1 tsp salt, 1/2 tsp pepper, and a pinch of paprika or lemon zest). Keep the rest simple so you’ll actually make these. Use pantry staples for most of this—panko, flour, eggs, and basic spices—so you won’t need to run to the store. For kids, aim for 3–4 sticks each; adjust with Portion charts if you track calories or serving sizes. If you want a healthier boost, swap half the panko for finely crushed whole-grain cereal or add a tablespoon of ground flax to the crumbs. Label leftovers and cool them before storing; they’ll reheat crisply in the air fryer. Serve with ketchup, tartar sauce, or yogurt dip nearby.
Equipment and Tools

A good air fryer is the star here, but you don’t need anything fancy—just one with a basket that fits a single layer of fish sticks so they crisp evenly. You’ll also want a few basics: tongs for flipping, a silicone brush for light oiling, a shallow tray for breading prep, and a digital thermometer for peace of mind. Accessory recommendations: a nonstick basket liner (perforated), oven-safe wire rack for extra airflow, and a small silicone spatula. Keep kid-friendly serving tools handy—small plates and dipping cups. For safety, use heatproof mitts and keep a timer within reach. After cooking, follow a simple Cleaning checklist: unplug, let cool, remove basket and drawer, soak and scrub with a soft brush, and wipe the interior with a damp cloth. Dry thoroughly before reassembling. These tools and habits keep your fish sticks crispy, cleanup quick, and little hands happy and kid-approved sauces.
Choosing the Best Fish
When you’re picking fish for air fryer fish sticks, go for firm, mild-flavored fillets that hold together—think cod, haddock, Alaska pollock, tilapia, or pollock-based whitefish—so your sticks don’t fall apart while crisping. Choose fresh or properly thawed frozen fillets with bright, neutral smell and resilient flesh; if it flakes too easily it’s not ideal. Consider sustainable sourcing: look for responsibly managed fisheries or farms to reduce environmental impact. Learn label meanings—“wild-caught,” “farmed,” “MSC certified,” or “ASC certified”—so you can match ethics and budget. Don’t be scared of budget-friendly options like pollock-based blends; they crisp well and please picky kids. If allergies or strong flavors are a concern, stick with the mild varieties above. Ask your fishmonger about origin and handling; a quick question tells you a lot. With a smart choice, you’ll get tender, flaky sticks that hold up in the air fryer and keep meal prep simple.
Preparing the Fish

You’ll pick a firm, mild white fish like cod or haddock for the best texture. If it’s frozen, thaw it in the fridge or under cold running water, then pat it completely dry. Finally, cut the fillets into uniform sticks so they cook evenly and crisp up in the air fryer.
Choosing the Fish
Because firm, mild-flavored fillets hold up best in the air fryer, pick cod, haddock, pollock, or tilapia—whatever’s freshest and in your price range. Check sustainability labels while you shop, and note allergy awareness for family members. Look for thick portions you can cut into sticks; fresher fish gives flakier, juicier results.
- Snow-white cod, firm and flaky
- Lean haddock with a mild sweet note
- Budget-friendly pollock that crisps well
- Tilapia: mild, easy for picky kids
- Skinless portions for even coating
Choose pieces with minimal odor, steady texture, and consistent thickness. You’ll have dependable, kid-approved fish sticks that cook evenly and taste homemade. If you prefer frozen fillets, check labels and avoid additives; fresh is ideal but smart packaging can still deliver quality for dinner tonight.
Thawing and Pat Dry
Thawing fillets in the refrigerator overnight gives the best texture and food-safety margin, but if you need them sooner, submerge sealed fish in cold water and change the water every 20–30 minutes until pliable (usually 30–60 minutes for single portions). When thawed, you’ll want to pat the fish dry with paper towels to remove excess moisture so coatings stick and the air fryer crisps properly. Do this on a clean surface and discard towels immediately to limit surface contamination; wash your hands and sanitize the area afterward. Keep the fish chilled while you work—don’t let it sit at room temperature—to maintain the cold chain. Dry fillets brown and crisp faster, and they’ll hold breadcrumbs without sliding around during cooking. Trust this small step—it matters.
Cutting Into Even Sticks
Slicing the fillets into even sticks makes them cook uniformly and finish with consistent crispness. You’ll use a steady angle technique, slicing against the grain for neat edges and predictable cooking. Aim for uniform sizing — about half to three-quarters inch thick — so every stick fries crisp at the same rate. Lay pieces on a tray, then pat and chill briefly so coatings stick.
- Long, tidy rectangles ready for breading
- Clean edges from a sharp knife
- Even rows on the cutting board
- Small, kid-friendly portions
- Crisp-ready shapes that look inviting
Work in batches so you don’t crowd the board, keep a cutting area, and use ruler or guide to check uniform sizing; kids enjoy helping sort and line up sticks before coating enthusiastically
Breading and Coating Options

Choosing the right coating makes a huge difference in texture and flavor, so pick one that matches how crisp or hearty you want your fish sticks. You’ll want a light panko crust for extra crunch, a classic breadcrumb for familiar kid appeal, or a flour-cornmeal mix for a sturdier bite. Think about Regional Coatings—tortilla crumbs for southwest flair, or curry-seasoned breadcrumbs for an Indian twist—and how they affect Finish Textures. Wet batters give a softer exterior; dry dredges create a crackly finish. Try mixing seasonings into each layer so flavor sticks with the coating.
| Coating Type | Best Result |
|---|---|
| Panko | Ultra-crisp |
| Breadcrumb | Kid-friendly crunch |
Keep coatings simple, test one combo at a time, and pick what your kids actually eat. You can swap gluten-free crumbs or add a touch of parmesan for adult palates without changing kid appeal. Rotate coatings weekly to avoid boredom and encourage tasting.
Air Fryer Cooking Instructions

Start by preheating your air fryer to about 400°F (200°C) so it’s hot and ready. Cook the fish sticks for roughly 8–12 minutes, flipping them halfway through for even crisping. Give them space in the basket and check for a golden exterior and flaky center, adjusting time a minute or two if needed.
Preheat & Temperature


Although it’s tempting to skip preheating, you’ll get crispier, more evenly cooked fish sticks if you let the air fryer warm for 3–5 minutes at 400°F (200°C); that temp gives a golden exterior without drying the fish. Preheating boosts energy efficiency by reducing overall cook time and helps overcome variations from ambient humidity so your breadcrumbs brown consistently. Set the fryer, wait, then load a single layer. Visualize the result:
- Hot circulation kissing each piece.
- Tiny steam beads escaping crust.
- Even golden browning edge-to-edge.
- No soggy spots from trapped moisture.
- A crunchy, kid-approved finish.
You’ll notice better texture and predictable results every time. If your air fryer has a preheat indicator, use it; otherwise trust the timer and avoid overcrowding for best heat flow.
Cook Time & Flipping
After preheating, cook the fish sticks at 400°F (200°C) for about 8–10 minutes, flipping once halfway—around the 4–5 minute mark—to get even browning and a crisp crust. You’ll want consistent flip intervals so each side crisps without drying; set a timer for the midpoint and resist peeking too early. Check doneness indicators like a flaky texture, opaque center, and internal temperature of 145°F (63°C) if you use a probe. If pieces vary in thickness, remove thinner ones a minute or two earlier. For extra crunch, spray a light mist of oil before the final minute. Serve immediately—kids love that hot, crunchy bite—and adjust future cook times based on your air fryer’s power. Make notes so you nail perfect results every time and family approved.
Serving Ideas and Dipping Sauces

How you serve your fish sticks can change the whole meal, so think beyond a plate and ketchup. You can create Sauce Flights and use Interactive Plating to get kids excited: set small bowls of sauces and arrange sticks like a sunburst or train. Offer hands-on choices so they pick combos and taste different textures.
Turn fish sticks into playful meals—offer sauce flights and interactive plating to get kids excited
- Creamy dill yogurt for cool contrast
- Tangy honey-mustard for sweet-sour kids
- Smoky BBQ for bold little eaters
- Zesty lemon-aioli for a bright kick
- Mild salsa verde for veggie vibes
Keep portions small and colors vivid; add carrot sticks, apple slices, or peas to balance flavors. Let kids dip, stack, or build mini sandwiches—this makes dinner playful and lowers fuss. For picky eaters, pair one familiar dip with one new option. Finish with napkins and toothpicks nearby so they can explore safely and you can enjoy the meal together. Repeat often for cheering feedback.
Meal Prep and Storage Tips

You can speed up weeknight dinners by assembling fish sticks ahead—bread, freeze or chill them on a tray, then bag or containerize for later. Let cooked sticks cool completely before sealing in airtight containers so they stay crisp and food-safe. When reheating from frozen, pop them straight into the air fryer for a few extra minutes until hot and crunchy.
Make-Ahead Assembly
Prepping fish sticks ahead saves time and keeps weeknight dinners stress-free: assemble them up to the point of cooking, freeze on a parchment-lined tray until firm, then transfer to a labeled freezer bag or airtight container with as much air removed as possible. Set up simple assembly stations so you and the kids work fast; Kid involvement turns prep into a game and speeds things up. Portion packs for lunches or dinners, label with date, and note cook time. When you’re ready, pop frozen sticks straight into the air fryer—no thawing needed.
- Flattened fish strips dredged quickly
- Breadcrumb bowl for dunking motion
- Egg wash station with tongs
- Parchment tray lined for freezing
- Labeled freezer bags stacked neatly
You’ll love the faster, calmer weeknight dinners.
Proper Cooling & Storage
Cooling fish sticks quickly prevents bacteria growth and keeps them crisp—don’t let them sit out more than two hours (one hour in hot kitchens); once they’ve cooled to near room temperature, tuck portions into shallow, airtight containers or zip-top bags and chill promptly. Label each container with date and contents so you can follow labeling protocols and rotate stock; write use-by dates based on safe storage times. Store fish sticks on a middle shelf where temperatures stay steady, and avoid overcrowding so cold air circulates. Be mindful of bacterial thresholds: keep fridge at or below 40°F (4°C) and discard anything that smells off or sits beyond safe timeframes. When handling leftovers, always use clean utensils to avoid cross-contamination. Check labels daily and trust senses.
Freezing and Reheating Tips
After chilling, freeze portions promptly to lock in freshness and texture.
You’ll cut portions, tray-freeze, then bag for quick meals.
- single-serving trays
- airtight bags sealed tight
- clear Labeling systems tags
- date stickers for rotation
- small, flat packages freeze fast
Thaw overnight in the fridge for best texture, or reheat from frozen in the air fryer at 380°F (195°C) for 8–12 minutes, flipping once. That saves time and lowers your Energy footprint. Cool to kid-safe temperature before serving. If you freeze often, track inventory with a simple app or whiteboard so you only defrost what you’ll eat, cutting waste and energy use. Label bags with reheating tips and allergy notes for caregivers. Check seals before freezing.
Nutrition Notes and Swaps

While air frying cuts most of the extra fat, you can tighten up the nutrition even more with a few smart swaps. Swap panko for crushed whole-grain cereal or oats to boost fiber, and choose a light spray of olive oil instead of drenching in oil for a crisp without excess calories. Use Greek yogurt in a tartar-style dip to add protein and reduce mayo. If you want omega-3s, pick salmon or trout fillets instead of white fish once in a while. Keep sodium low by seasoning with herbs, lemon zest, and a pinch of smoked paprika rather than extra salt. Practice Allergy Awareness: label batches and avoid shared crumbs if you serve nut-containing sides. Follow general Dietary Guidelines for portion sizes and balance—pair sticks with a veggie-rich slaw and a whole-grain side. These small swaps keep meals kid-friendly, satisfying, and better for everyday eating. And family-approved always.
Troubleshooting Common Issues

If your fish sticks come out soggy, dry, or oddly browned, don’t panic—you can fix most issues with a few simple tweaks. Check spacing so air circulates; overcrowding causes sogginess. Preheat the basket to crisp faster, and pat fish dry before breading to avoid steam. If they brown too fast, lower temperature ten degrees and extend time. For uneven cooking rotate basket halfway. If your air fryer sparks or trips, inspect for electrical issues and stop using it until it’s checked.
Soggy, dry, or browned fish sticks? Preheat, avoid overcrowding, pat dry, lower temp if browning too fast.
- Single layer, no overlap for even crisp.
- Light oil spray for golden crunch, not soggy.
- Use thermometer for flaky 145°F center.
- Flip once halfway for uniform color.
- Clean promptly; odor removal and buildup prevent off-flavors.
Follow these fixes and you’ll get consistent, kid-approved fish sticks every time. Rotate batches, monitor closely, and adjust time or temp based on your family’s preferences regularly.
Conclusion
You’ve just made a batch of kid-friendly air fryer fish sticks that beat frozen ones hands down. They’re crisp, flavorful, and way healthier, and you’ll feel proud serving something homemade without fuss. Keep experimenting with coatings and dips until you find your family’s favorite—it’s like treasure hunting for taste. Store extras for quick lunches, and don’t worry if the first try’s imperfect; practice makes perfect and you’ll get it dialed in fast in no time.


