
You’ll make restaurant-quality arancini in an air fryer by starting with well-chilled, short‑grain risotto, stuffing chilled mozzarella cubes, double‑coating with flour→egg→panko, then spraying lightly with oil. Preheat to 375°F (190°C), arrange single layer and cook 10–12 minutes, flipping once for even browning. Chill between coats to prevent leaks and use panko over a breadcrumb base for extra crunch. Follow the full steps and tips ahead to nail texture, melt, and color every time, and reliably.
Origins of Arancini and Regional Variations

Although arancini grew from humble leftovers, they’ve become Sicily’s most famous street snack and you’ll find distinct versions across the island. You’ll notice shapes change by region: in Palermo they’re round, in eastern Sicily cone-shaped to honor Mount Etna. You’ll trace a lively street evolution from piazzas to markets, where vendors adapted fillings to local tastes and schedules. An Etymology debate pops up often — does arancini refer to little oranges or to a term for layered rice? Either way, that history informs how communities named and served them. When you travel, watch how texture and size shift neighborhood by neighborhood; coastal towns favor lighter, seafood-leaning versions, inland spots go heartier. You’ll also see festivals and family recipes guarding techniques, so you can learn variations that suit quick weekday snacks or slow celebratory meals. Keep these regional cues in mind as you recreate arancini at home today too.
Ingredients You’ll Need
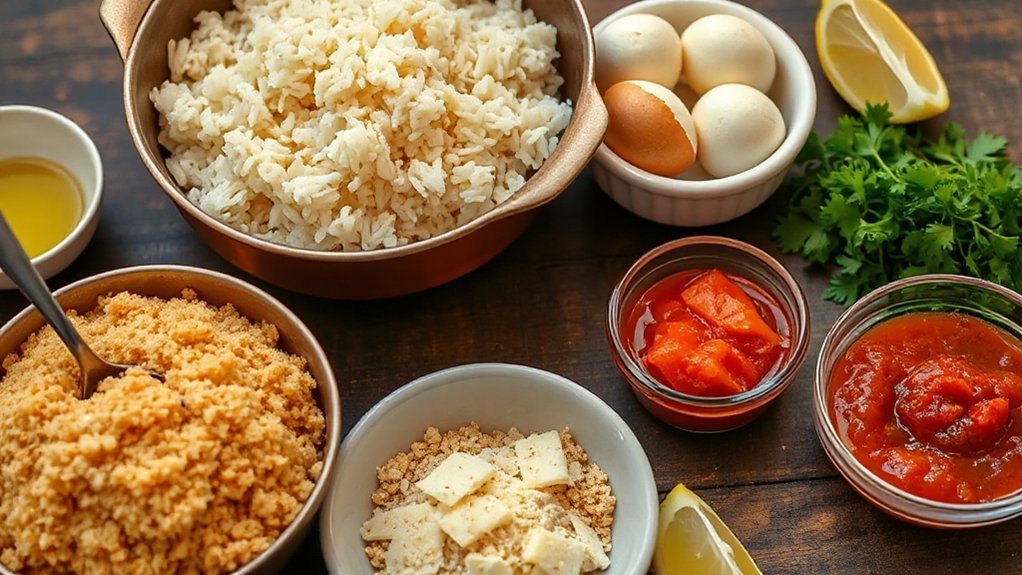
When you’re ready to make air fryer arancini, gather a few simple, quality ingredients so the process stays quick and tasty: chilled short-grain rice or leftover risotto (Arborio works best), grated Parmesan, eggs to bind, and a small ball of mozzarella or other melting cheese for the center.
Gather chilled Arborio rice, grated Parmesan, eggs, panko, and a small mozzarella center for quick, tasty air-fryer arancini
You’ll rely on a mix of fresh components and shelf stable staples for convenience. Add flavor enhancers like a pinch of nutmeg, salt, and freshly ground black pepper, and consider chopped parsley for brightness. Use panko or fine breadcrumbs to get that crisp exterior; they toast beautifully in the air fryer. Keep portioning simple so you can assemble and seal each rice ball without fuss. Grab olive oil for brushing if you like a deeper golden finish.
- Cooked Arborio rice or leftover risotto
- Fresh mozzarella balls or cubes
- Grated Parmesan and eggs
- Panko breadcrumbs and seasonings
Equipment and Prep Checklist
To make things easy, gather a few key tools so assembly and cooking move smoothly: your air fryer (with a basket roomy enough to avoid overcrowding), two shallow bowls for the egg wash and breadcrumbs, a small scoop or spoon for uniform portions, a baking sheet or tray to stage the arancini, a brush for oil, tongs for turning, and a thermometer if you like exactness. Lay everything out with a clear workstation layout so you can move from filling to coating to frying without backtracking. Use the table below as a quick visual of essentials.
| Item | Purpose |
|---|---|
| Air fryer | Crisps without deep frying |
| Bowls | Egg wash, breadcrumbs |
| Scoop | Consistent size |
| Brush & tongs | Oil application, turning |
Prep also includes a simple timing plan: set risotto cooling time, rolling window, and air fry batches so each ball gets even heat. Have napkins handy and preheat the air fryer.
Making a Perfect Risotto Base

With your station set, it’s time to build the risotto base that’ll hold everything together: short-grain rice, hot stock, patient stirring, and just enough butter and cheese for creaminess. You toast rice briefly, deglaze with wine if you like, then add ladlefuls of simmering stock. Use a steady Stirring rhythm — not frantic, not idle — to coax out starch and create that glossy texture. Keep Heat control steady: gentle simmer, not rolling boil, so the rice cooks evenly without drying. Taste often for al dente; timing varies by rice. Finish off with cold butter and grated cheese, folding briskly to enrich and bind the grains.
- Use Arborio, Carnaroli, or Vialone Nano
- Keep stock hot in a separate pot
- Add liquid gradually, one ladle at a time
- Stir with intention, not speed
This risotto will be creamy, cohesive, and ready for forming into arancini centers and piping hot.
Chilling and Handling Cooked Rice
Chilling cooked risotto rapidly stops carryover cooking and firms the grains so you can shape arancini without a gloopy mess.
| Tip | Why it matters |
|---|---|
| Spread thin | Speeds rapid cooling |
| Chill 15–20 min | Improves temperature control |
After cooking, spread the risotto thin on a rimmed sheet to speed rapid cooling; don’t pile it. Use a fan or place the pan in the fridge uncovered for 15–20 minutes, then cover. Monitor temperature control: cool to under 40°C (104°F) quickly to prevent overcooking and bacterial growth. When handling cooled rice, work with slightly chilled portions so grains stick but stay distinct. Keep hands moist, not wet, to avoid squashing grains. Store leftovers in an airtight container and chill within two hours; label with time and use within 24–48 hours for best texture. Quick handling and strict temperature control give you firm, manageable rice that won’t slip apart during breading or air-frying.
Shaping and Filling the Rice Balls
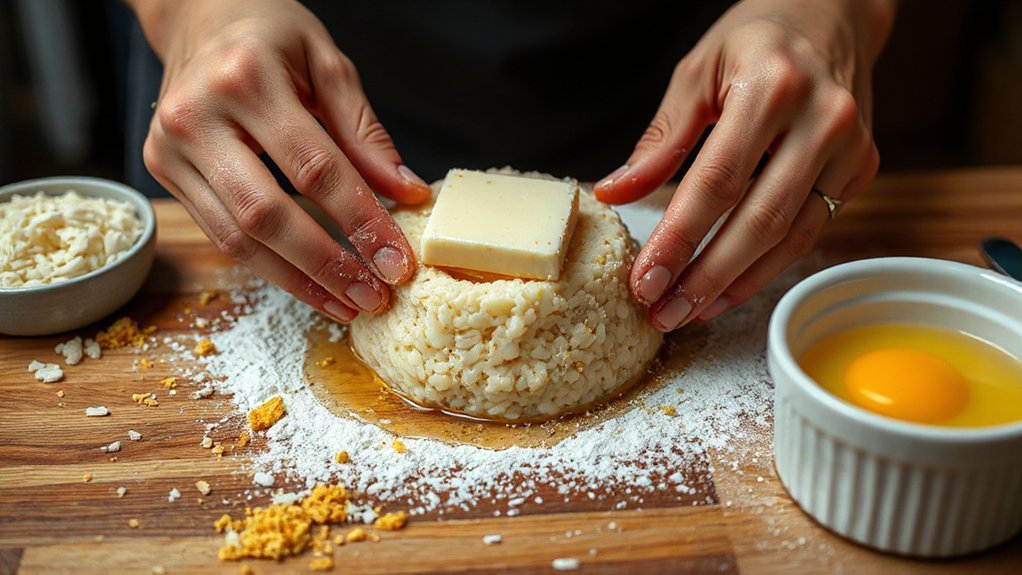
Start by scooping a palmful of chilled risotto and pressing it into a compact cup to form a sturdy base. Nestle a small cube of mozzarella in the center, then top with more rice so it’s fully enclosed. Seal and smooth the seams with damp hands so they’ll hold together in the air fryer without leaking cheese.
Forming the Base
Once the risotto’s cool enough to handle, you’ll wet your hands, scoop a handful, and press it into a compact disk so it holds together without being gummy. Use a confident finger technique to shape a stable base; aim for even base consistency so the sphere forms smoothly. Keep motions quick and firm, not mashing. If it’s too loose, chill briefly; too sticky, add a dusting of breadcrumbs to your palms. Roll edges upward to create a slight cup ready for filling later.
- Wet hands prevent sticking
- Press firmly, not squish
- Check base consistency by tapping
- Chill if rice won’t hold
Work swiftly, keep your palms damp between balls, and trust your fingers — practicing this finger technique builds speed and consistent arancini every time.
Adding Mozzarella Center

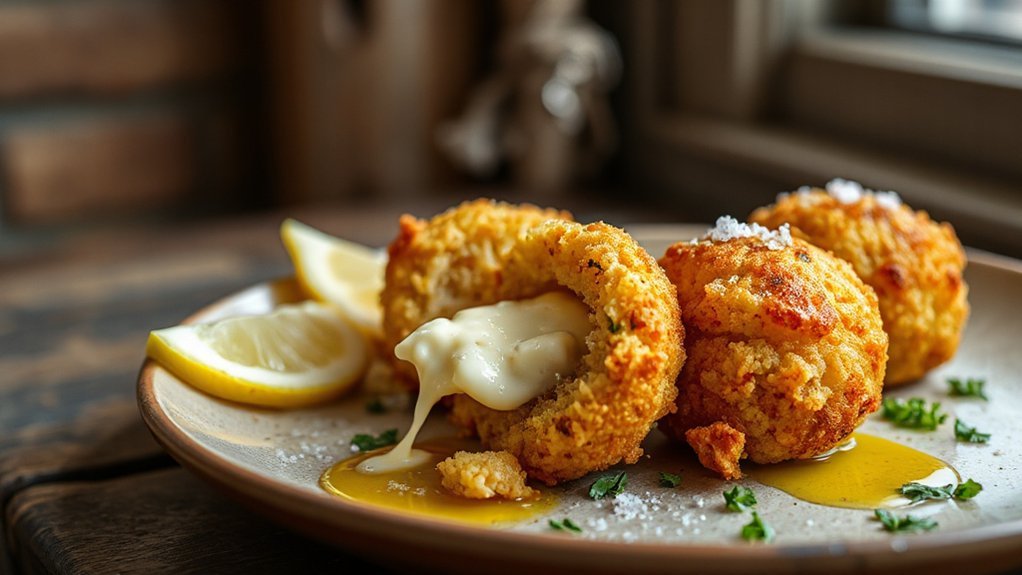

Tucking a cold cube of mozzarella into the center gives you that molten, cheesy payoff every time: press the rice disk into a shallow cup with your thumb, drop in a 1–1.5 cm (about ½ inch) piece of well-drained mozzarella, then bring more rice around and over it, pressing firmly to seal so no cheese peeks out. Use chilled balls or Frozen centers if you want a cleaner melt and less runout; they’re handy for make-ahead batches. Keep mozzarella well-drained and trim excess liquid. Add a light Herb infusion to the rice before shaping — chopped parsley or basil brightens each bite without overpowering. Work quickly so cold cheese stays intact, and test one sample to guarantee gooey core and stable exterior every time.
Sealing and Smoothing
Shaping the rice into a smooth, well-sealed ball is where the arancini hold their magic—so press firmly but gently, cupping the rice around the filling with your fingers and using your palm to roll until seams disappear; if you feel any gaps, add a little more rice and compress again to prevent leaks. You want a neat gloss finish and solid seam concealment to avoid cheese oozing during air frying. Keep motions compact, don’t overwork rice, and chill balls briefly for better handling. For consistent results, use uniform portions and a gentle but decisive squeeze. Tips:
- Use chilled mozzarella
- Tuck edges under securely
- Roll between palms for gloss finish
- Lightly wet hands to help seam concealment
Cool briefly before breading to firm shape completely.
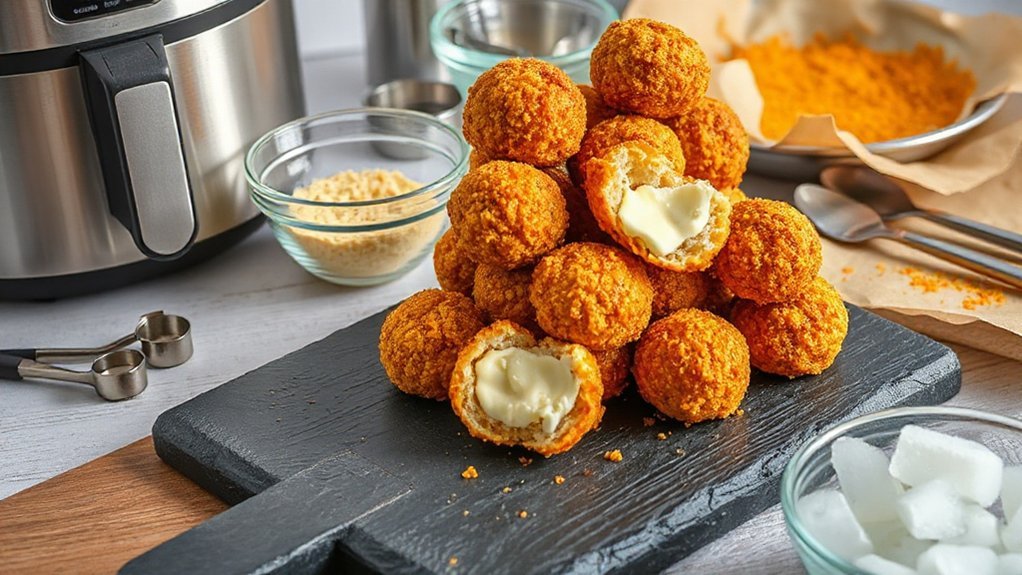
Breading Techniques for Maximum Crunch
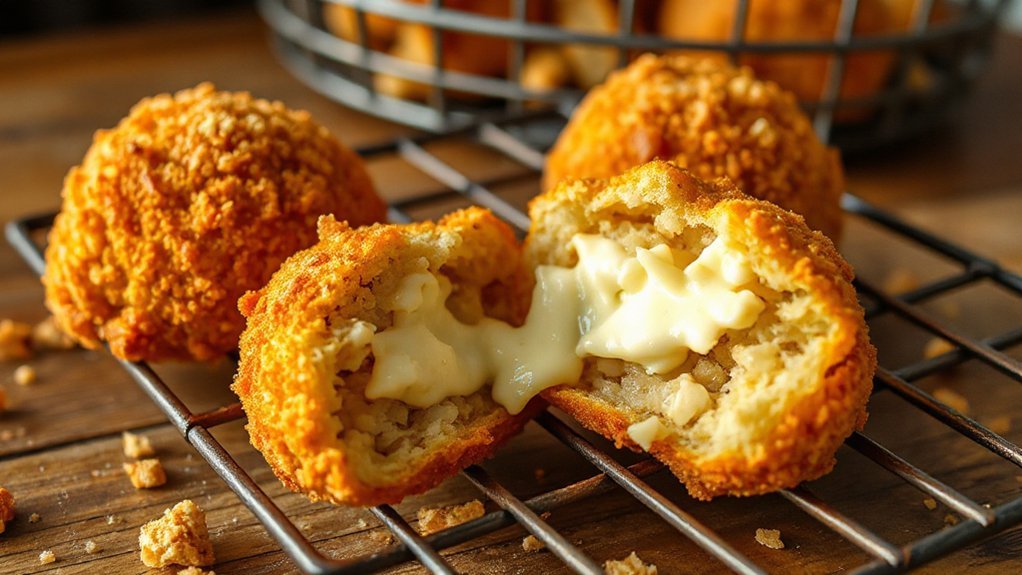
You’ll get max crunch by doing a double-coating: flour to help the egg stick, then a first light crumb layer, chill, and finish with a thicker second layer of crumbs. For the first coat use a fine crumb or crushed panko so it adheres, then press a second wetter layer on after the egg wash for extra texture. Panko gives an airy, flaky crunch while traditional breadcrumbs make a denser, nuttier crust—use panko for lightness or mix them for more bite.
Double Coating Technique
Crusting your arancini in two coats — flour, egg, panko, then egg and panko again — gives you an extra-durable shell that crisps up in the air fryer without falling apart. For home cooks and small-scale producers, this method borrows reliability from industrial applications, and it helps with packaging considerations because the firm crust resists moisture and deformation during transport. You’ll get a predictable crunch and fewer failures.
- Seal seams tightly before coating
- Chill balls to set the first layer
- Use a shallow tray for even dredging
- Spray oil lightly between batches
Work briskly, keep hands cool, and test one sample so you adjust timing for your fryer. Repeat with small batches to maintain crispness and prevent sogginess; record times for consistency every time.
Panko Vs Breadcrumbs
After a double coat sets up a sturdy shell, choosing between panko and regular breadcrumbs will determine the texture you get from the air fryer. You’ll notice texture differences: panko yields a light, flaky crunch that stays crisp longer, while standard breadcrumbs pack denser, uniform coverage that browns evenly. Use panko when you want explosive crunch and flakes; pick fine breadcrumbs for a smooth, golden finish and tighter adhesion around fillings. For best results, mix styles: a panko outer layer over a breadcrumb base balances hold and crunch. Also consider the nutritional comparison: panko often has fewer oils but similar calories, while flavored or seasoned crumbs add sodium. Taste and handling should guide your pick. Experiment to find what suits your arancini best today.
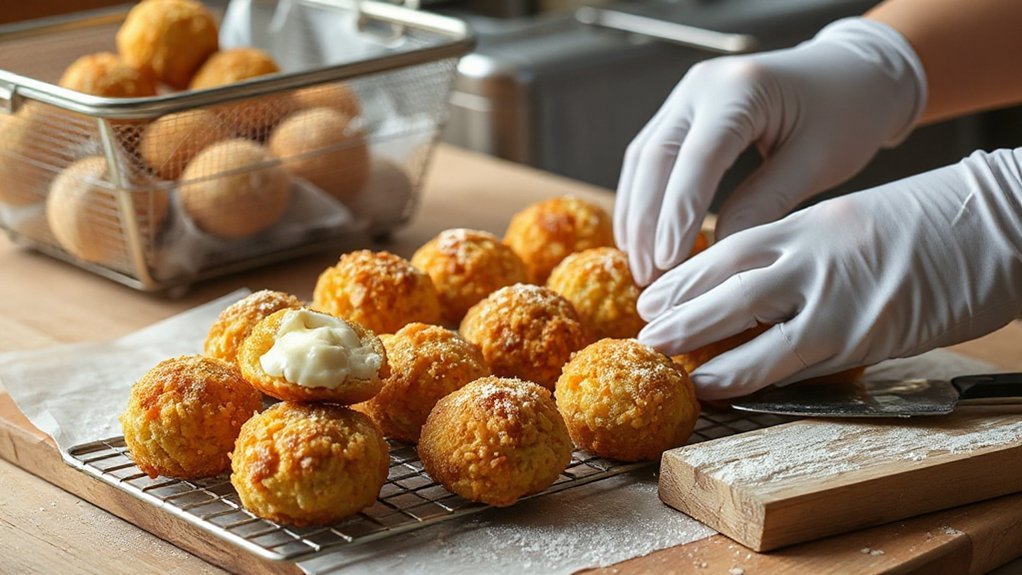
Air Fryer Settings, Timing, and Batch Cooking

If you want golden, crisp arancini without soggy centers, set your air fryer to 375°F (190°C), preheat for a few minutes, and cook in single layers with light oil spray—flip once halfway through. Use sensible Preheat settings and quick, confident timing: 10 to 12 minutes total, checking at 8 minutes. Think about Capacity planning so you don’t overcrowd the basket; air circulation is everything. Work in batches that let each ball breathe.
For golden, crisp arancini, preheat air fryer to 375°F, single-layer batches, light oil spray, flip halfway.
- Arrange a single layer with space around each arancini.
- Spray lightly to promote even browning.
- Flip at the midway point for uniform crispness.
- Rest briefly after cooking to set the crust.
Keep batches consistent in size so timing stays predictable. If you have a larger model, increase batch size but keep the single-layer rule. Jot down times for your specific fryer; you’ll dial in perfect results fast. Record notes after each batch for reliable repeats.
Serving Suggestions, Dips, and Pairings

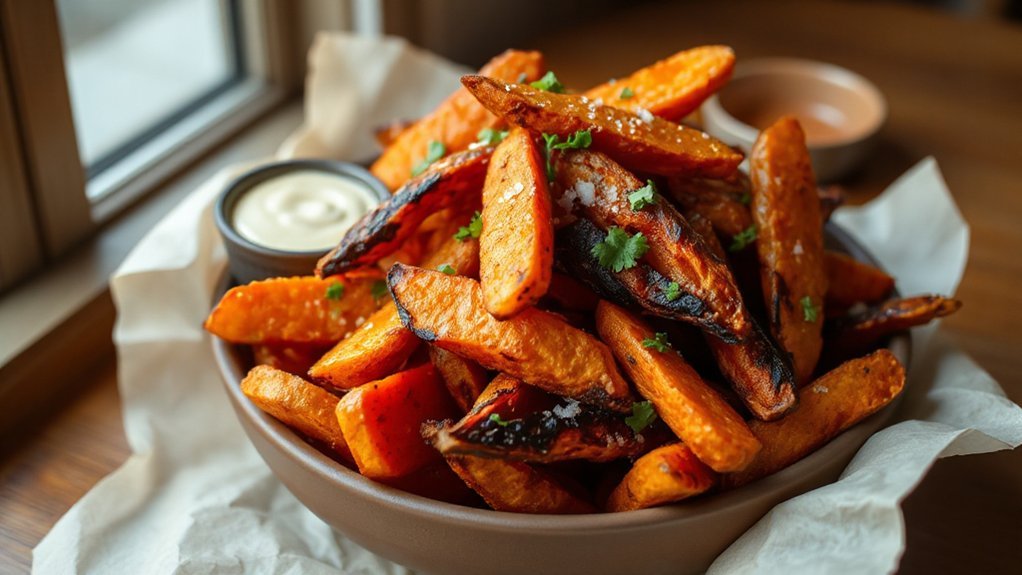
With your arancini crisped and rested, pick sauces and sides that highlight the creamy risotto rather than smother it. Offer a simple marinara warmed with a splash of good olive oil, and a lemon-garlic aioli for a bright counterpoint. Serve small bowls of balsamic reduction or spicy arrabbiata for guests who like heat. For a lighter approach, arrange Salad Companions like peppery arugula with shaved fennel, or a fennel and orange salad dressed simply with citrus and olive oil.
When choosing Wine Pairings, think acidity to cut the richness: a chilled Verdicchio, Pinot Grigio, or a light Chianti works well. For a shared platter, include roasted cherry tomatoes, pickled peppers, and thin prosciutto slices to add texture. You’ll want napkins, toothpicks, and a few dipping bowls so everyone can mix flavors and keep the bites neat and fun. Finish with grated Parmesan for sprinkling and extra savory hits, too.
Storage, Reheating, and Troubleshooting

You’ll learn how to store cooked arancini so they stay crisp and safe. You’ll get quick reheating tips to restore the crunchy exterior and creamy center. Finally, we’ll troubleshoot common problems—soggy shells, undercooked centers, or rice that falls apart—and give simple fixes.
Storing Cooked Arancini
When you’re done frying or air-frying arancini, don’t just toss them in the fridge—let them cool slightly, then store in a single layer in an airtight container with parchment between layers to keep the crust crisp; they’ll keep about three to four days refrigerated or up to one month frozen. For longer trips, consider vacuum sealing or using a chilled cooler for picnic transport; label containers with date and filling. Freeze flat, then stack to save space. Defrost in fridge overnight before serving. Avoid soggy crust by keeping moisture away during storage.
- Use parchment between layers.
- Chill completely before sealing.
- Label date and filling.
- Freeze individually for easy portioning.
If you notice off odors, mold, or sliminess, discard the arancini to avoid foodborne illness.
Reheating for Best Texture
Reheating arancini properly preserves that crunchy exterior and gooey center, and you’ll get the best results by using dry heat—think air fryer or oven—rather than the microwave. Preheat your air fryer to 350°F (175°C) and reheat for 5–8 minutes, flipping halfway; in a 375°F (190°C) oven, use a wire rack on a baking sheet for 10–15 minutes. These methods apply crust science: dry circulating heat re-crisps breadcrumbs without sogginess. For best Moisture control, let refrigerated arancini sit 10–15 minutes at room temperature before reheating so interiors warm evenly. If you froze them, thaw overnight in the fridge first. Check internal temp—aim for about 165°F (74°C). Serve immediately so contrast between crisp shell and molten center stays vivid. Enjoy the revived texture every time.
Troubleshooting Common Issues
Having trouble getting that perfect crunch or molten center back? Use these quick fixes:
- Cool completely before storing.
- Separate fillings to prevent cross contamination.
- Reheat at 350°F for crispness.
- Chill before frying to keep coating intact.
Store leftovers in airtight containers; refrigerate up to 3 days or freeze up to 1 month. Reheat 5–8 minutes from fridge, 10–12 from frozen, flipping halfway. If centers stay cold, microwave 10–15 seconds then crisp in air fryer. Always follow safety precautions: use tongs, keep kids away, and discard any that smell off. Test one ball first to adjust time and avoid undercooked centers or overbrowning issues. If coating still won’t stick, try a double dredge: flour, egg wash, and panko again before frying.
Conclusion
You’ll finish these arancini with a golden crackle that makes weeknight dinner feel like a Roman feast. You’ll work fast, keep rice chilled, and tuck mozzarella into each heart so every bite melts. Use the air fryer’s heat and your patience—then serve immediately. It’s simple, bold, and transportive, like a Vespa ride past sunlit piazzas; you’ll impress without fuss and eat with the same joyful appetite as La Dolce Vita, you’ll want seconds every time.


