
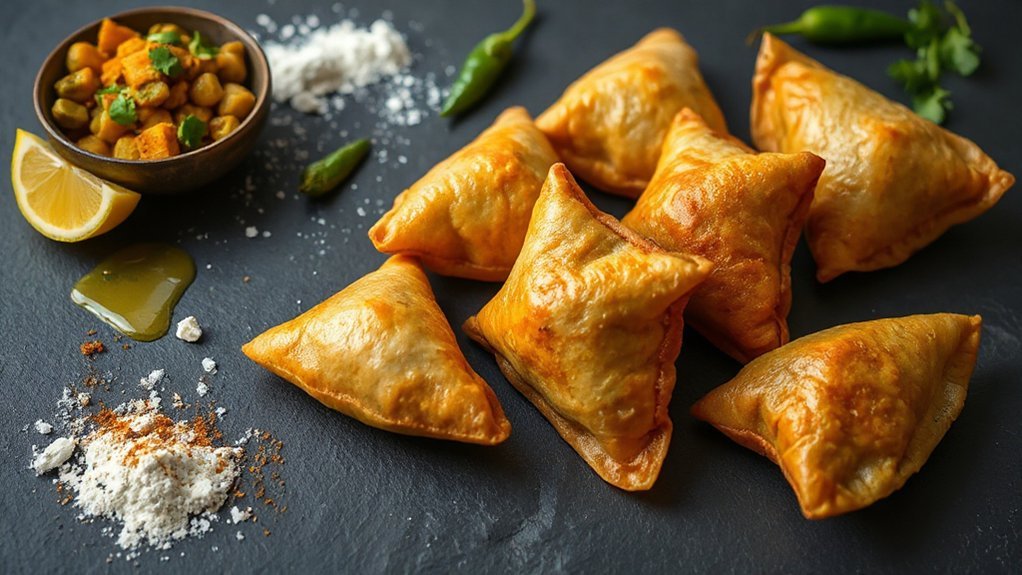
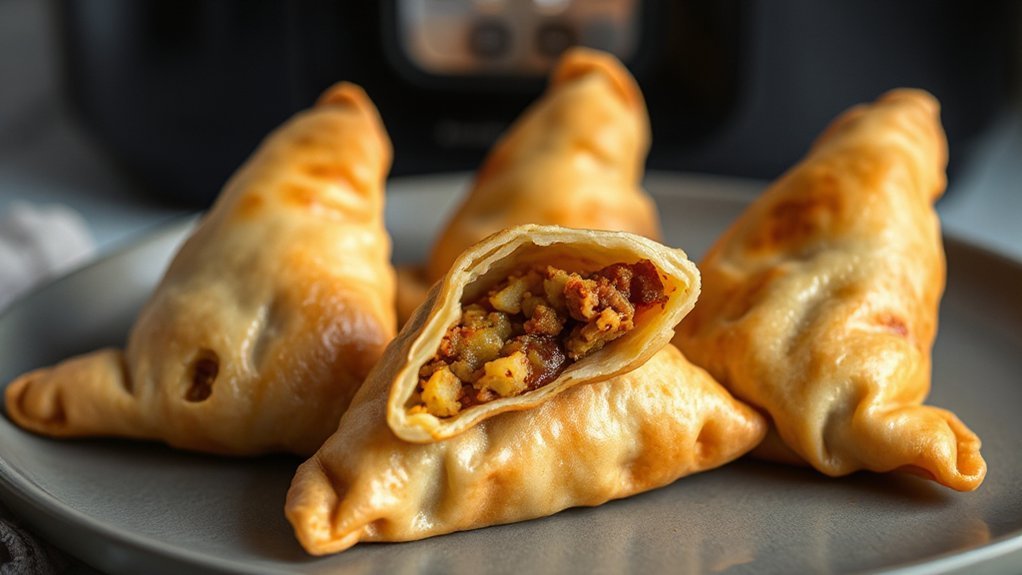
You can make restaurant-quality, crispy Indian samosas in your air fryer using a simple oil-based pastry and a spiced potato‑pea filling. Mix flour, a pinch of salt and oil, add cold water and rest the dough briefly. Sauté cumin, onion, peas, ginger and mashed potatoes with turmeric, coriander and lemon. Fold into triangles, brush lightly with oil and air fry at 375°F until golden. You’ll soon pick up useful tips on assembly, timing and storage.
Ingredients for the Pastry and Filling
You’ll need just a few pantry staples to make the pastry—all‑purpose flour, a pinch of salt, a neutral oil or ghee, and some cold water to bring the dough together—and a handful of fresh or pantry ingredients for the filling: starchy boiled potatoes, cooked peas, a diced onion, garlic and ginger, and warming spices like cumin, coriander, turmeric, and garam masala. Measure ingredients for balance: flour to fat ratio keeps pastry crisp while minimal water prevents toughness. For the filling, mash potatoes coarsely, fold in peas, sautéed onion, aromatics, and spices; season with salt and a squeeze of lemon. Consider the nutritional breakdown—portion size, carbs from potatoes, protein from peas, and fat from the pastry—all affect calories. Offer allergen alternatives: use gluten-free flour blends or chickpea flour for pastry, swap ghee for neutral oil for vegan samosas, and replace peas with lentils if preferred. You’ll find it simple.
Equipment and Air Fryer Setup
With the dough and filling ready, gather a few simple tools and sort out the air fryer so cooking goes smoothly: a mixing bowl, rolling pin or small bottle, a sharp knife or pizza cutter, a pastry brush for oil, and small spoons for shaping. You’ll also want a silicone spatula, a small tray to hold shaped samosas, and an oil spray if you like extra crisp.
With dough and filling ready, gather simple tools and prep the air fryer for smooth, efficient cooking.
- Check accessory compatibility — confirm your fryer basket fits folded samosas without overcrowding.
- Preheat the air fryer to 180°C (350°F) for 3–5 minutes so pastry starts crisping immediately.
- Lightly oil the basket or use a perforated liner, and arrange samosas in a single layer with space between.
- Keep a timer and tongs handy for even turns and transfers.
Run through basic cleaning methods before you start — detachable baskets and trays wash easily. This setup keeps cooking efficient and cleanup simple.
Preparing the Dough
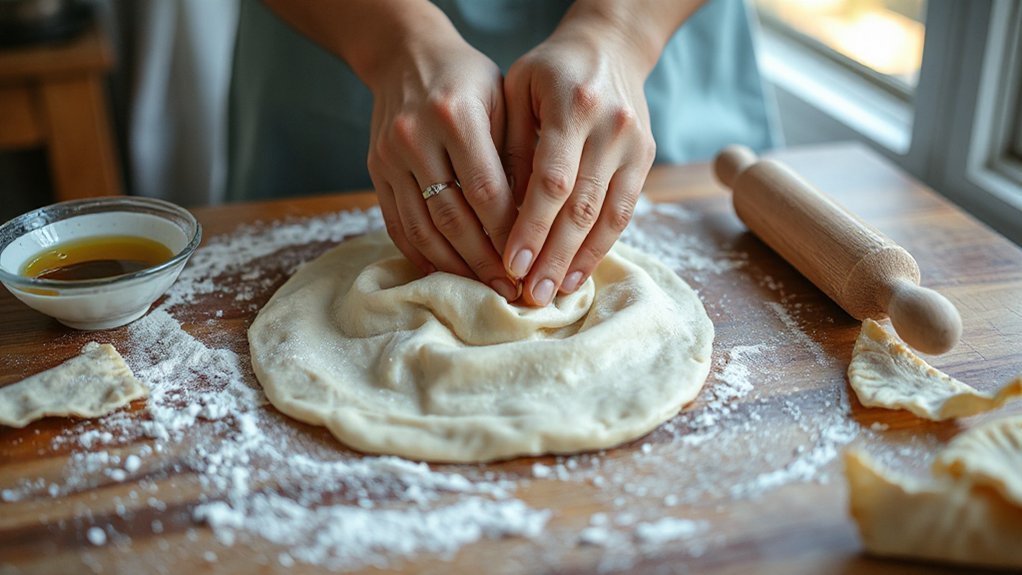
Kneading a tender, flaky samosa dough starts with just four ingredients: all-purpose flour, a pinch of salt, a little oil or ghee, and cold water. You’ll mix the flour and salt, rub in oil until the mixture looks like coarse crumbs, then add cold water gradually. Use a light touch so the dough comes together without getting sticky. For samosas you want a slightly firm dough that relaxes, so don’t overwork it.
Master a simple kneading technique: press with the heel of your hand, fold, rotate, and repeat for about five to seven minutes. That short, controlled work builds enough Gluten development to give structure but keeps the pastry tender. Rest the dough wrapped for at least 20 minutes so gluten can relax; this makes rolling easier and helps achieve crisp layers when air fried. You’ll be ready to shape soon—confident and calm. And your samosas will shine.
Making the Spiced Potato Filling
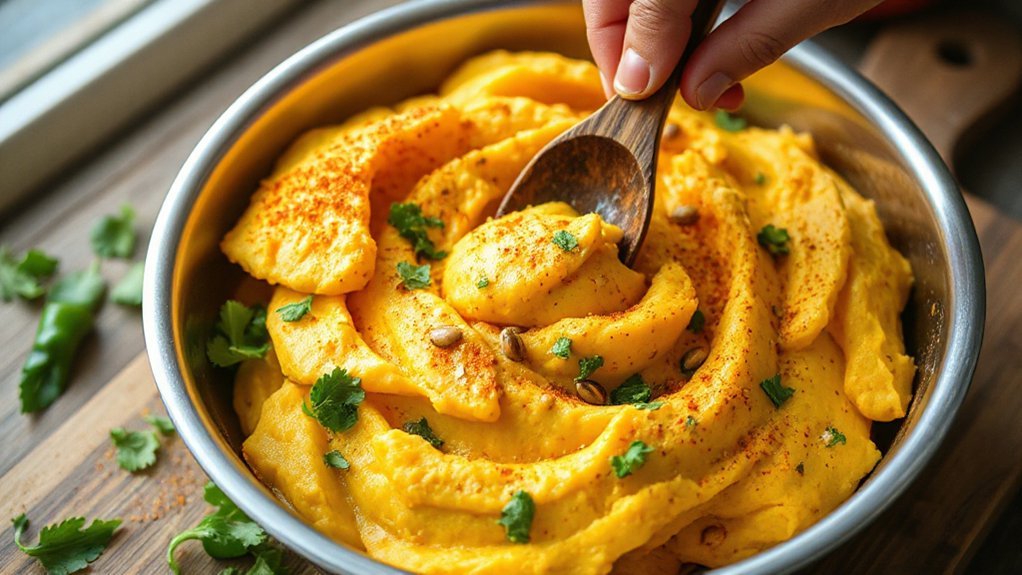
Pick starchy or all‑purpose potatoes so the filling holds together without getting gummy. You’ll temper mustard seeds, cumin, and curry leaves in hot oil, then add aromatics and ground spices to wake up the flavors. Mash to a slightly coarse texture, finish with salt, lemon, and cilantro, and taste for heat before you start stuffing.
Selecting the Potatoes
Although you can use several potato types, choose starchy or all-purpose potatoes—like Russets or Yukon Golds—because they mash cleanly and soak up spices, giving your samosa filling the right texture and flavor. Consider starch classification when you shop; starchy potatoes yield fluffy mash, all-purpose give a creamier bite. Also note harvest timing: newly harvested potatoes can be waxier, so adjust cooking slightly. Pick uniform sizes for even cooking and cool them before peeling to avoid soggy filling.
- Russets for light, fluffy texture.
- Yukon Golds for creamy, rich mouthfeel.
- All-purpose blends when you want balance.
- Avoid waxy salad potatoes for this filling.
You’ll notice flavor and moisture change with variety, so taste as you go and tweak salt, lemon, or texture before stuffing for balance.
Tempering and Spices

Once you heat your oil and pop the mustard and cumin, the whole kitchen wakes up—this quick tempering is where the filling gets its punch. You’ll add cumin, mustard, curry leaves, chilies and turmeric, blooming oils and releasing aroma chemistry that lifts potatoes. Stir in ginger, garlic, chilies and coriander for bright notes; add garam masala for warmth. These spices add Health benefits like anti-inflammatory and digestive support, so you’re seasoning with purpose. Keep spices moving in the pan so they don’t burn. Use salt and lemon to balance. Below is a quick guide:
| Spice | Function | Use |
|---|---|---|
| Mustard | Temper | 1 tsp |
| Turmeric | Anti-inflammatory | 1/2 tsp |
| Garam masala | Aroma | 1/2 tsp |
Finishing Texture and Taste
Balance the texture so the filling holds together without being gluey: you’ll want mostly mashed potatoes with some small chunks for bite, plus just enough moisture from oil or a splash of water to make the mixture pliable. You’ll finish by tasting for salt, lemon, and spice so the filling complements the pastry and creates crispness contrast when air fried. Aim for flavor harmony between cumin, coriander, chili, and fresh herbs. Mix gently to keep chunks intact.
- Cool potatoes fully to prevent soggy dough.
- Adjust oil and lemon for moisture and brightness.
- Fold in cilantro and peas last for freshness.
- Test a small fry to confirm seasoning and texture.
You’ll love how flaky pastry meets a warm, seasoned center that sings on every bite.
Assembling and Sealing the Samosas
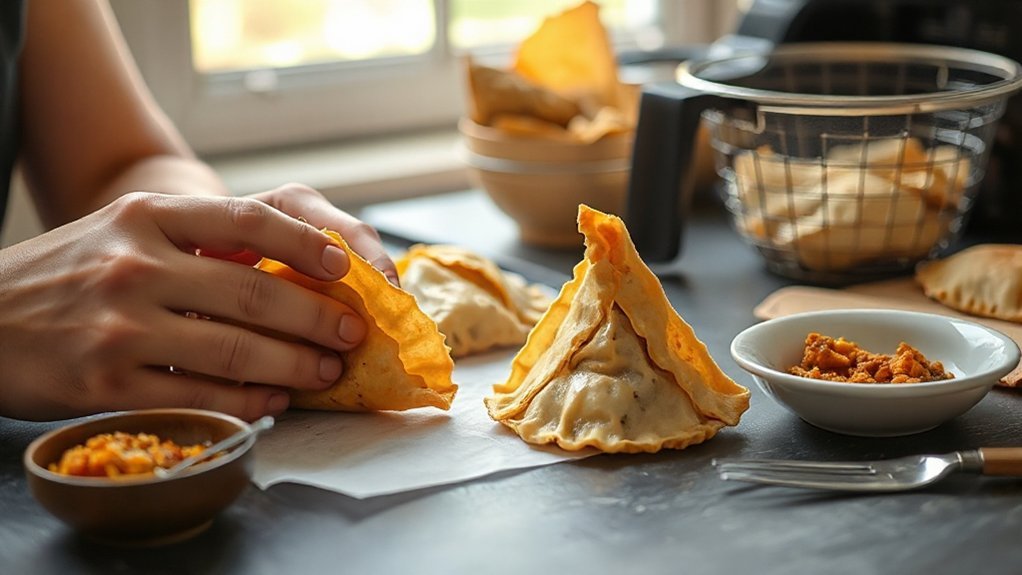
Now you’ll fold each pastry into a neat pocket around the spiced potato filling, tucking the edges so the shape holds. Moisten the seams with a little water or beaten egg, press out any air pockets, and fold into the classic triangular samosa. Finish by firmly sealing and crimping the edges with your fingers or a fork to prevent leaks during air frying.
Folding the Pastry Pocket
After you’ve spooned the filling along the strip, fold and tuck to form a neat triangular pocket—pinch each edge firmly so the filling can’t escape during air frying. This simple fold respects cultural variations in shape and size while keeping strong visual aesthetics for serving. Work steadily, keeping edges aligned and the pastry taut. If a flap sticks out, trim or fold it under.
- Fold the corner over to start the triangle.
- Tuck the long side snugly to encase the filling.
- Continue folding in triangles until you reach the end.
- Press gently to secure the final flap.
You’ll get consistent, crisp pockets that look great and cook evenly. Serve them hot with chutney for best contrast and immediate enjoyment now.
Sealing and Crimping Edges
When you seal the samosas, a confident pinch and a little moisture are all you need to keep the filling inside and get those attractive, crisp edges—brush a thin line of water or egg wash along the flap, press firmly to join the layers, then crimp the seam with your fingers or a fork to lock it in. Work quickly but calmly so pastry doesn’t dry; if needed, dab a touch more moisture. Try tiny folds or rope-like crimps to add decorative motifs while improving grip. Keep shapes consistent for even cooking and aesthetic symmetry across the batch. If a seam shows gaps, reseal and press again. Practice gives speed, polish and neatness—soon you’ll effortlessly assemble samosas that look as great as they taste.
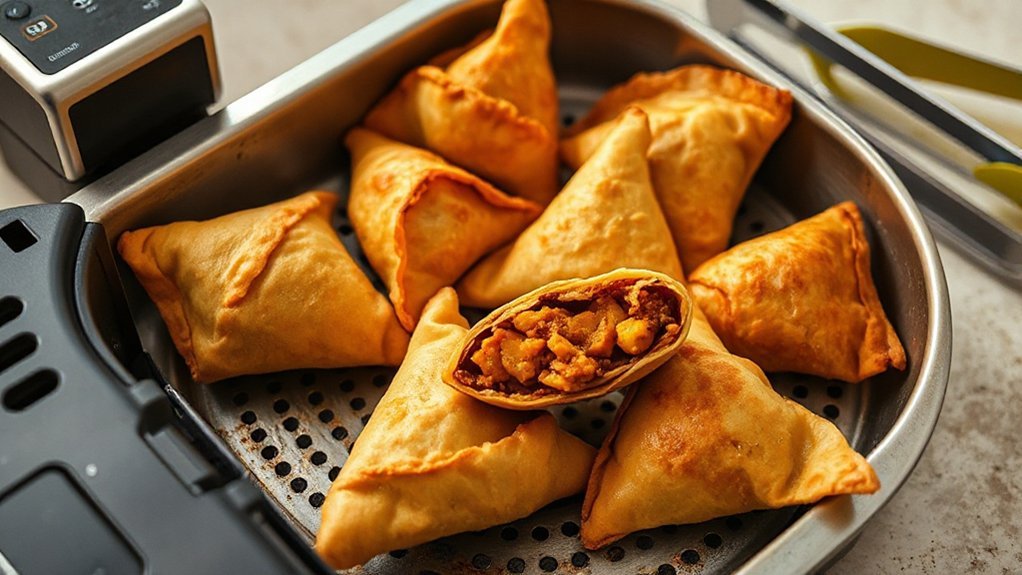
Air Frying: Temperature and Timing
Although air fryer models heat differently, you’ll usually get the best results for samosas between 350–400°F — 375°F is a great starting point for a crisp, golden shell. Use preheating benefits: warm air gives even browning and helps pastry puff. Depending on size, cook 6–8 minutes per side, flipping halfway for uniform color. Remember altitude adjustments: at higher elevations you may need slightly higher temp or longer time.
Air fry samosas at 375°F (350–400°F range), preheat, flip after 6–8 minutes per side; adjust for altitude.
- Small, thin samosas: 350°F for 8–10 minutes, flip at 5 minutes.
- Medium samosas: 375°F for 10–12 minutes, flip halfway.
- Large or tightly packed: 390–400°F for 12–14 minutes, check early.
- Spray lightly with oil and avoid overcrowding; leave space for air flow.
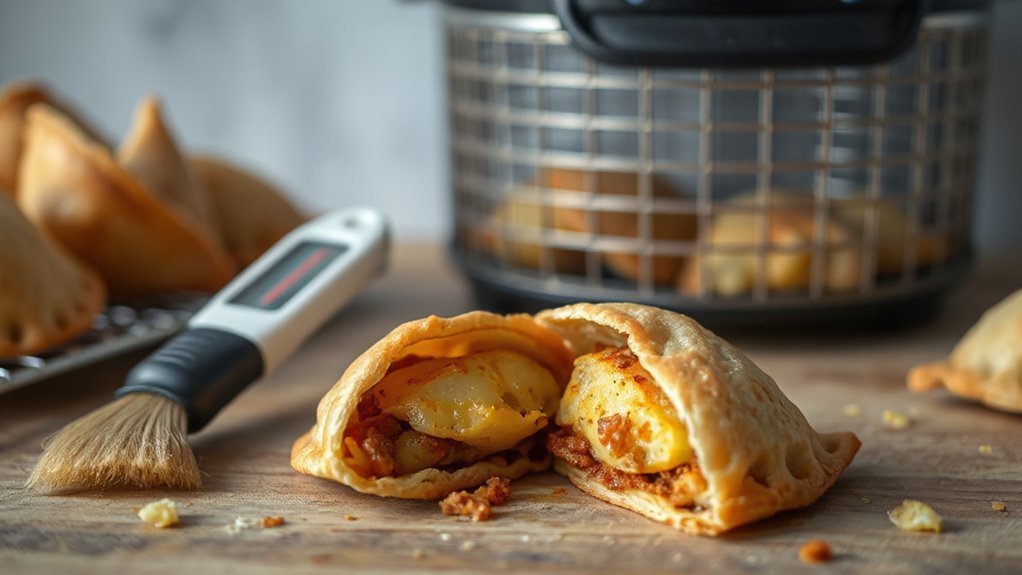
You’ll know they’re done when shells are deep golden and filling is hot; don’t rely only on time—watch color and texture. If in doubt, check a samosa’s internal temperature or open one to inspect the filling before serving. Enjoy immediately.
Freezing, Reheating, and Storing

If you want to keep samosas on hand, freeze them raw or fully cooked on a baking sheet until firm, then move them to airtight bags or containers to prevent freezer burn and sticking. When packing, think about Portioning Sizes—bag individual servings for quick snacks or group packs for parties. Use robust freezer bags or vacuum-seal for best texture. Always add Labeling Dates on each package so you rotate stock and eat the oldest first; samosas keep best for up to three months. To reheat, air fry from frozen at 375°F (190°C) for 12–18 minutes, flipping halfway, until golden and hot; thawed ones take less time. For refrigerated storage, keep cooked samosas in an airtight container for 2–3 days. Cool completely before sealing to avoid sogginess. When reheating, check internal temperature and crisp the pastry by giving a blast in the fryer—you’ll get flaky edges without overcooking filling.
Serving Suggestions and Chutneys
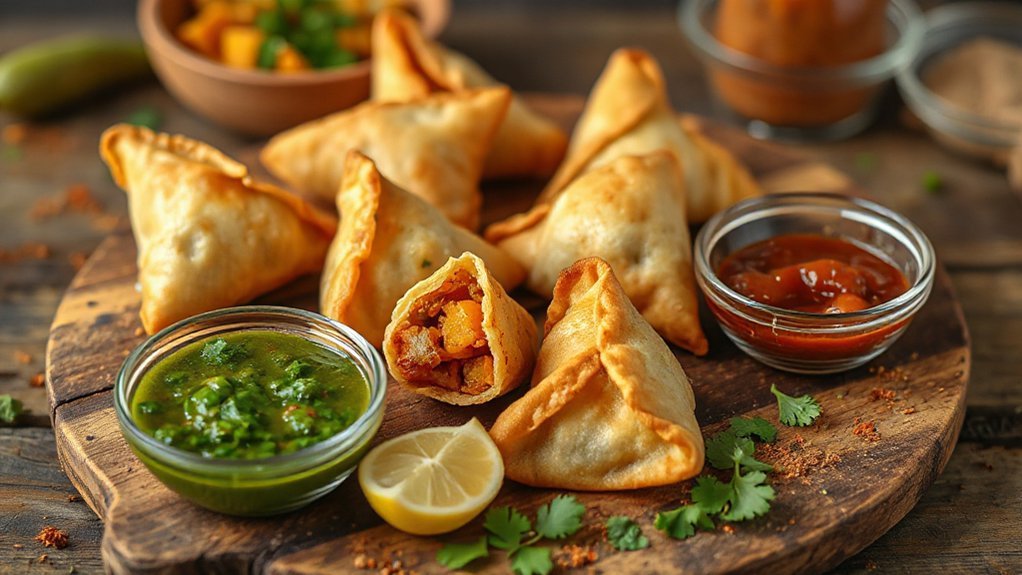
What pairs best with air-fryer samosas? You’ll want bold, bright accompaniments that cut through the fried pastry. Offer a trio of chutneys—mint-cilantro, sweet tamarind, and spicy mango—so guests can mix and match. For Beverage Pairings, serve masala chai for warmth, a crisp lager to cleanse the palate, or a zesty lime soda for contrast.
- Mint-cilantro chutney: herbaceous, tangy, quick to blitz.
- Tamarind-date chutney: sweet-sour, classic with potato filling.
- Spicy mango chutney: fruity heat for adventurous eaters.
- Yogurt raita: cooling, sesame or cumin-sprinkled.
Plate samosas with small bowls of each chutney to highlight Chutney Variations and let people build flavor combinations. You’ll make snacking social and satisfying—just provide napkins and extra chutney for dipping. A simple garnish—fresh cilantro, lemon wedges, and thinly sliced onions—adds color and brightness, and you can offer toothpicks for easy sharing. Serve immediately for best texture and happiest guests. Ever enjoy.
Troubleshooting and Expert Tips
When your air-fryer samosas come out undercooked, overbrowned, or soggy, here’s how to fix it and make every batch crisp and consistent. First, check filling moisture: drain excess water, cool mixture before wrapping, and don’t overstuff. If bottoms brown too fast, lower temperature by 10–15°F and extend time; flip halfway. For sogginess, preheat the basket, avoid overcrowding, and spray oil lightly—too much causes limp pastry. Use a thermometer: samosas are done at 165°F internal. For high-altitude cooking, make Altitude Adjustments—increase temperature slightly and shorten time to combat lower air pressure. When feeding a group, plan Crowd Scaling: bake in batches on a single layer, keep finished samosas warm on a rack in a low oven, and crisp them briefly before serving. Clean the basket between batches to prevent smoking. Practice and small tweaks will get you reliable, golden samosas every time. Trust your instincts; taste as you go.
Conclusion
You’ve just conquered the art of air-fried samosas — you’re basically a culinary wizard who tamed pastry and potato into irresistible, crunchy triangles. In minutes, you’ll stun guests, silence skeptics, and probably start a samosa fan club. Keep tweaking spices, stash extras in the freezer, and don’t forget the chutney (it’s practically mandatory). Enjoy the crispy glory you created; your kitchen just became the happiest, most snackable place on earth on the planet, seriously. No contest.


