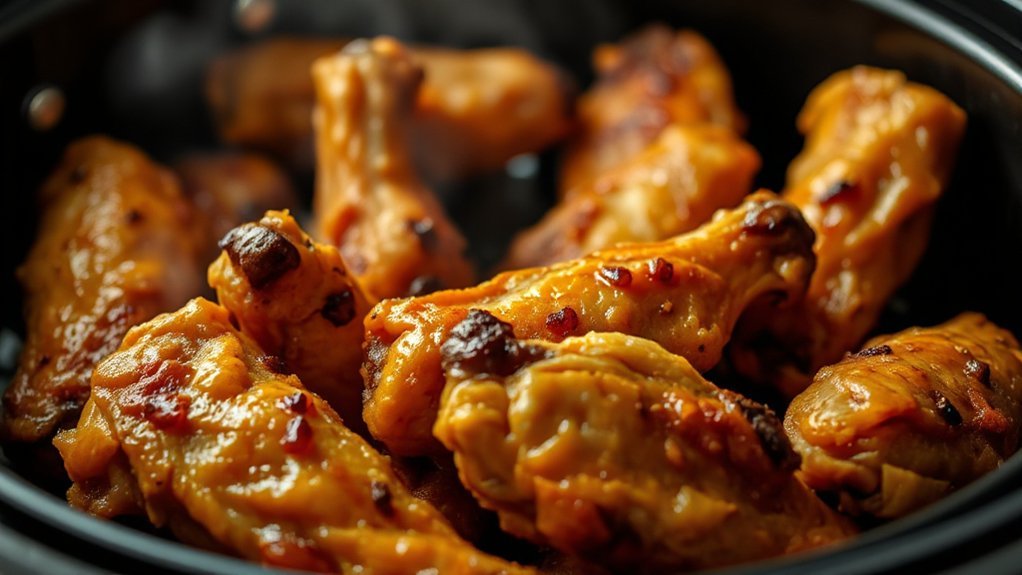
We’re fixin’ to show you how to get cracklin’ skin and juicy meat—fast and fuss-free. This simple method starts with a rinse, a pat dry, a light oil rub, and seasoning tucked under the skin. Then we lay pieces in a single layer, flip halfway, and aim for 165°F without touching the bone.
Expect two tasty paths: a smoky-sweet dry rub or a bright lemon-pepper butter finish. We’ll walk you through temps (350–375°F), times (about 25–45 minutes depending on size), and reheating tricks to bring back that crisp.
We keep gear simple—basket or tray, tongs, paper towels—and explain why spacing and airflow matter for shatter-crisp skin. Follow our step-by-step and this recipe will be a go-to for weeknights, tailgates, and holiday trays.
Key Takeaways
- Pat dry, oil lightly, season under and over the skin for best results.
- Cook single layer and flip halfway; target 165°F for doneness.
- Typical cook window: 25–45 minutes at 350–375°F.
- Two seasoning routes: smoky-sweet dry rub or lemon-pepper butter.
- Reheat at 330°F for 4–5 minutes to restore crisp.
Why You’ll Love This Recipe
We love that these pack big flavor, finish fast, and free up the main oven for the rest of your meal. This method gives you crackling skin and juicy meat in about 25–45 minutes, depending on size and temp.
Quick and tidy: Most batches are ready in roughly half an hour at 375°F. Cleanup is a breeze, and the appliance keeps things out of the oven so you can finish your other favorites.
Big flavor, two ways: Go smoky-sweet with brown sugar and smoked paprika, or brighten things with lemon-pepper butter and a touch of garlic. Pantry spices like garlic powder, onion powder, thyme, and cumin add savory depth.
- Friendly for new cooks—simple steps and common seasonings.
- Scales for game day—cook in batches and keep warm between turns.
- Dial heat with cayenne, add herbs like rosemary, or try a Cajun twist.
“Reliable results every time—use a thermometer, rest a few minutes, and you’ll lock in the juices.”
| Benefit | Average Time | Seasoning Ideas | Best For |
|---|---|---|---|
| Extra crispy skin | 25–30 min (small) | Smoked paprika + brown sugar | Weeknight dinners |
| Juicy meat | 30–45 min (large) | Lemon-pepper butter | Holidays & crowds |
| Fast cleanup | Hands-off cooking time | Garlic, onion, thyme | Game day platters |
What You’ll Need: Equipment and Tools
Grab these simple tools and you’ll be set for even, reliable cooking every time. We keep the kit small—just the things that help heat move, seasoning stick, and a clean finish.
Basket vs. tray: getting even airflow
Basket or tray—both work. What matters most is space. Place each piece in a single layer so hot air can dance all around. Crowding causes steam, not crisp.
If your model has racks, pick the mid-level for steady heat and easier flipping.
Must-have tools
- Use an air fryer basket or fryer basket with room to spare—no stacking.
- Tongs speed up flipping—turn pieces halfway for even browning.
- Paper towels: pat the skin very dry before oiling and seasoning.
- A reliable thermometer or meat thermometer confirms 165°F at the thickest part without touching bone.
“Pat dry, give each piece breathing room, flip once, and don’t guess—use the thermometer.”
| Tool | Why it matters | Quick tip |
|---|---|---|
| Basket / Tray | Promotes airflow for crisp skin | Don’t overcrowd; single layer only |
| Tongs | Safe, quick flipping | Flip halfway for even color |
| Thermometer | Prevents under/overcooking | Check 165°F at thickest part |
Ingredients and Flavor Boosters
Let’s talk ingredients that build bold flavor without fuss. Start with meaty turkey wings, a drizzle of olive oil, coarse salt, and black pepper. These four set the stage for great skin and juicy meat.
Classic dry rub blends brown sugar, smoked paprika, onion powder, garlic powder, thyme, cumin, and pepper. Rub some under the skin and over it—don’t skip that step. The spices melt into the meat while the skin crisps.

Lemon-pepper twist: melt butter, stir in lemon juice, lemon pepper, and a little garlic. Toss hot wings in that sauce and finish with chopped parsley for brightness.
“Tuck seasoning under the skin—flavor hides there and the skin still gets nice and crunchy.”
- Swap olive oil for a neutral oil if you prefer—the goal is just enough oil to help spices stick.
- No smoked paprika? Use regular paprika and add a pinch of cayenne for heat.
- Adjust salt if your lemon-pepper mix is pre-salted.
| Component | Purpose | Quick tip | Best swap |
|---|---|---|---|
| Olive oil | Helps seasoning stick, promotes browning | Use sparingly—just a light drizzle | Neutral oil |
| Dry rub | Creates smoky-sweet crust | Tuck under skin for max flavor | Cajun or rosemary-cumin |
| Lemon-pepper sauce | Bright, garlicky finish | Toss wings while hot for glaze | Hot honey butter |
How to Make Air Fryer Turkey Wings (Step-by-Step)
Let’s break this down—prep, season, cook, and rest—so dinner runs smooth and tasty. We keep steps short and friendly so you can follow along without fuss.
Prep
Preheat the air fryer to 350–375°F for about 5 minutes so it’s properly hot. Rinse, then pat each piece dry—really dry. Dry skin is the secret to golden, shattery crust.
Season
Brush a light coat of olive oil so spices stick. Work your rub under the skin and over it—seasoning tucked under gives deeper flavor.
Air fry
Place turkey wings in a single layer with breathing room inside the fryer basket or basket. Slide it in and cook, flipping once halfway for even color.
Time varies—about 25–45 minutes depending on size and temp. Start checking near the low end so you don’t overdo it.
Rest
Verify an internal temperature of 165°F at the thickest spot using a thermometer. Don’t touch bone for a true read.
Pull and let wings rest 5–10 minutes so juices settle. That short wait keeps the meat tender and juicy.
- Finish hotter for a minute or two if skin needs extra crisp—watch the sugar in rubs so it doesn’t burn.
- Hold cooked batches in a warm oven while you finish the rest for steady service.
“Preheat, dry well, season under skin, flip once, and rest—simple steps, big payoff.”
Air Fryer Temperature and Time
Set your dial and timer—this is where temperature meets timing for perfect crisp and juicy meat. Pick a lower temp for gentle cooking or crank it for a faster finish. Both routes work; you just adjust minutes.
Cook ranges to follow
At 350°F, plan about 40–45 minutes. At 375°F, many pieces finish closer to 25–30 minutes. Flip once halfway to even out browning and speed crisping.
Size and timing tips
Big drums run longer than flats—start checking a few minutes early and add time as needed. If your batch is large, cook in rounds so hot air circulates around each piece.
- Use a meat thermometer and confirm an internal temperature of 165°F at the thickest spot.
- Garlic, onion, thyme, and smoked paprika handle these temps fine—just mind sweet rubs so they don’t darken too fast.
- Rest a few minutes after cooking—carryover heat evens the finish. If skin needs extra crisp, bump temp 2–3 minutes at the end.
“Set a timer, check color and juices, and trust the thermometer.”
Doneness Cues and Internal Temperature
When you judge doneness, trust both your eyes and your probe—each tells a part of the story. Aim for a safe internal temperature of 165°F at the thickest spot. Be careful not to press the probe against bone when you check.

Target read and visual checks
Look for crisp, golden skin and clear juices running from the meat. A quick slice at the thickest part should show glossy, not bloody, liquid. If you spot pink near the bone but are close to 165°F, give it a minute and recheck.
Tools and resting
Use a reliable thermometer or meat thermometer to avoid guesswork—this keeps the meat tender and saves you from overcooking. For best results from the air fryer, test big drums in two spots since thickness varies.
Let wings rest minutes—we suggest 5–10 rest minutes. Letting the pieces sit lets juices reabsorb so every bite stays moist. If you overshoot the temperature a tad, a good rest and a saucy finish can help.
“Check color, trust the probe, then give it a short rest—simple steps, juicy results.”
Pro Tips for Extra-Crispy Skin
Want skin that snaps? These simple moves turn soggy pieces into crunchy, golden bites every time. We’ll keep it honest and short—do these and you’ll notice the difference.
Prep and placement
Dry, dry, dry. Pat each piece with paper towels like you’re buffing a shine so the skin can blister up nicely.
Give them room. Use the air fryer basket so every piece has breathing space. Crowding makes steam, not crunch.
Flip, finish, and timing
Flip once halfway for two-sided browning. If skin still needs a kick, raise temp for a couple minutes at the end—watch close so you don’t overbrown.
Oil is a helper, not a bath. A light coat carries seasoning and helps fat render without sogging the skin.
- Don’t stack—cook in batches for consistent crisp.
- Preheat so hot air hits from the start.
- If your rub has sugar, save the hottest finish for the last few minutes.
“Rest briefly, then serve right away—crispy skin waits for no one, darlin’.”
Main Seasoning Paths: Sweet-Smoke vs. Lemon Pepper
Deciding on a seasoning path is the fun part—one leans sweet and smoky, the other wakes up the plate with lemon and butter. We’ll keep both mixes simple so you can pick a vibe and stick to it.
Smoky-sweet dry rub
Start with brown sugar and smoked paprika for cozy, caramelized edges. Add garlic powder, onion powder, thyme, cumin, salt, and pepper.
Tuck some seasoning under the skin and rub the rest on top. That gives deep flavor and a nice crust on the meat.
Bright lemon-pepper butter
Melt butter and whisk in lemon juice, lemon pepper seasoning, and a touch of garlic. Toss the hot pieces right out of the air fryer so the sauce clings.
Prefer lighter? Use a small splash of butter and a drizzle of olive oil instead of all butter. Adjust salt—some lemon pepper blends are already salty.
- Add cayenne for heat or parsley for a fresh pop.
- Both paths pair great with creamy sides or crisp slaws.
- Make extra rub or sauce and stash it—easy wins for future recipes.
“Pick your mood—smoky-sweet for cozy, lemon-pepper for bright—and we’ll show you the simple steps to get there.”
air fryer turkey wings: Variations and Substitutions
We like to keep things flexible—small flavor swaps turn one recipe into many. Try a bold rub, a sticky glaze, or an herby mix depending on the mood and the crowd.
Cajun heat: Shake on Cajun seasoning for a peppery kick. It’s an easy swap for the dry rub and plays nice with a squeeze of lemon or a cooling dip.
Hot honey butter: Melt butter, stir in honey and a pinch of cayenne, then toss the hot pieces so the glaze clings. Sweet meets heat—real crowd-pleaser.
Rosemary-cumin: Mix chopped rosemary with ground cumin and a touch of garlic for a fragrant, cozy option. Great for cooler nights and plate-filling meals.
Swap-ins: chicken wings or duck wings
If you can’t find turkey, use chicken wings—the method stays the same but expect shorter cook time since pieces are smaller. Check temps early.
Duck wings are richer and a bit fattier—treat them like a luxe swap. They crisp beautifully and pair well with sweet glazes or herb blends.
- Marinate lemon-pepper pieces 30 minutes to overnight for deeper citrus-garlic flavor.
- Brush with olive oil before seasoning to help spices stick and to boost crisp.
- Preheat for each batch—consistency in heat = consistent results.
- Taste as you go—adjust salt and heat to suit your crew.
“Mix-and-match sauces at the table so everyone gets their favorite—simple, flexible, and friendly.”
Serving Ideas and Side Dish Pairings
When the platter hits the table, everyone’ll reach in—so arrange sides to match bold flavors and easy snacking. We love family-style spreads that let folks pick a favorite and pile it on.
Game day platters and weeknight dinners
Pile ’em high on a big platter for game day. Offer both seasoning paths so guests can choose their favorites and try a little of each.
For a cozy weeknight, keep it simple—serve with mashed potatoes or mac and cheese and call it supper, y’all. Make-ahead sides keep dinner easy while the last batch crisps.
Top sides to pair
Bright cuts: Vinegar slaw or pineapple slaw balance rich, crispy skin. They add crunch and zip.
Comfort picks: Mashed potatoes (dairy-free options work great), mac and cheese, and Cajun rice make a hearty spread.
Veg and bread: Garlicky greens or roasted Brussels and air fryer garlic bread are perfect for soppin’ up drips.
- Mix sauces at the table—hot honey, lemon pepper butter, or pan-dripping gravy for dunkin’.
- For lighter plates, choose roasted veggies or a crisp salad.
- Serve different textures—creamy, crunchy, and saucy—for the best bites.
- Family-style always wins—pass the bowls, tell a story, and enjoy the moment.
“Pile high, pass bowls, and let everyone pick their favorite—simple, friendly, and full of flavor.”
| Side | Why it works | Best pairing | Prep time |
|---|---|---|---|
| Mashed potatoes | Creamy counterpoint to crispy skin | Smoky-sweet rub | 20–30 min |
| Vinegar or pineapple slaw | Bright, acidic cut-through | Lemon pepper butter | 10–15 min |
| Cajun rice & garlicky greens | Hearty, savory Southern flavors | Both seasoning paths | 25–35 min |
| Air fryer garlic bread | Great for soppin’ up juices | Any sauced finish | 8–10 min |
Sauces and Finishes That Elevate Flavor
A bright or sticky finish can lift the whole platter—let’s mix up three easy sauces that sing. These quick finishes bring extra flavor and make every bite memorable.
Lemon pepper butter is zesty and rich. Melt butter, whisk in fresh lemon juice, lemon pepper, and grated garlic. Toss the hot pieces right away so that citrus and garlic cling and shine.
Hot honey butter is sweet heat in a spoon. Melt butter with honey and a pinch of cayenne. Stir and coat while the pieces are hot for a glossy, sticky finish that folks will fight over.
Pan drippings gravy and lighter swaps
Don’t waste pan drippings—warm them, whisk in a splash of stock and a little flour or cornstarch, season, and spoon over meat or mashed potatoes. It’s quick comfort that tastes like you worked all day.
- If you want lighter, stir in a drizzle of olive oil so the sauce still clings without heavy richness.
- Taste your lemon pepper—some blends are salty; balance with more lemon or butter.
- Keep sauces warm on low so they don’t seize—gentle temperature control keeps them silky.
- Double the sauce if you love extra coating. Add parsley or chives at the end for color and fresh zip.
“Toss straight from the basket—heat helps every drop of sauce soak in and shine.”
| Finish | Main ingredients | Best use |
|---|---|---|
| Lemon pepper butter | Butter, lemon juice, lemon pepper, garlic | Bright, garlicky finish—best for citrus fans |
| Hot honey butter | Butter, honey, cayenne | Sweet-heat glaze—great for crowd-pleasing plates |
| Pan drippings gravy | Drippings, stock, flour/cornstarch, seasoning | Comforting spoon-over for meat and mash |
Make-Ahead, Storage, and Reheating
Make-ahead magic means less fuss and more time for the good stuff. Cool cooked pieces to room temperature, then move them into airtight containers so flavor and texture stay put.

Fridge storage
Refrigerate in an airtight container and keep in the fridge up to 3-4 days. Label with the date so you know when to eat it.
Freezer tips
For longer time, wrap tight or use a freezer bag and freeze for 2-3 months. Thaw overnight in the fridge to protect texture and make reheating easier.
Reheat and finish
To re-crisp, reheat in your air fryer at 330°F for about 4-5 minutes. This short blast warms through and restores the crust without overcooking.
- If sauced, warm gently and toss with a splash more sauce before serving.
- Avoid the microwave when you can—it softens the skin and steals the crisp.
- Reheat batches briefly and then let them rest minutes so carryover heat finishes the job.
- Store promptly once cool and don’t reheat more than once for safety.
“Leftovers make mighty fine lunches—stash them right and they’ll taste like fresh.”
Troubleshooting: Common Mistakes and Fixes
If your crust won’t crisp, don’t fret—drying, spacing, and a quick temp boost usually fix it. We’ll walk you through the usual hiccups and easy fixes so your platter comes out proud.
Not getting crisp? Check dryness, spacing, temp, and flipping
Pat pieces bone-dry before seasoning. Moisture is the enemy of crunch.
Give each piece breathing space in the air fryer basket or fryer basket. Crowding traps steam—cook in batches if needed.
Flip once halfway for even browning. If you want extra snap, nudge the temperature up for the last minute or two—watch close so sugars don’t burn.
Tough meat? Prevent overcooking with a thermometer and rest time
Toughness usually means overcooked meat. Use a reliable thermometer and aim for an internal temperature of 165°F at the thickest spot—don’t touch bone.
Pull and let pieces rest so juices redistribute. That short pause makes a big difference in tenderness.
- If your rub’s sugar darkens too fast, lower the temperature and add a few extra minutes.
- Uneven browning? Rotate the basket or swap rack positions halfway through cooking.
- Soggy after saucing? Toss hot pieces back in for 1–2 minutes to re-crisp the skin.
- Keep notes on your fryer—every model runs a touch different. Your second batch will be perfect.
“Pat dry, give space, trust the probe, and rest a spell—simple fixes for big payoff.”
Nutrition Snapshot and Portion Tips
Let’s break down what’s in a serving so you can eat well and enjoy every bite. We’ll keep it short and useful—little swaps change calories without stealing flavor.
Protein-packed pieces and mindful seasoning swaps
Typical serving delivers roughly 20–35g protein, depending on size and how much skin or butter you use. That makes this a hearty, stick-to-your-ribs supper option.
For a lighter plate, ease up on butter-based finishes and lean into lemon juice, herbs, or a no-sugar rub. Cutting sugar in the rub trims calories fast.
- Portion fairly: Serve drums and flats evenly so everyone gets meat and crisp skin.
- Balance the plate: Pair with greens, slaw, or roasted sprouts to cut richness.
- Cooking note: Using an air fryer keeps added oil low—just enough to crisp, not drown.
Track your own nutrition if you need exact counts—sauces and skin can nudge totals. Leftovers reheat well, so portion today and enjoy a tidy lunch tomorrow.
“Small seasoning swaps let you keep the flavor and control the calories.”
Choosing and Sourcing Turkey Wings
Finding good pieces at the market makes the whole meal easier—so let’s shop smart and ask for what we need.
Whole vs. split, trimming, and talking to your butcher
Whole pieces give you a rustic look and plenty of meat. Split pieces cook a tad more evenly and are easier to serve.
If trimming isn’t your jam, ask the butcher to remove tips or split at the joints. They’ll do it quick and tidy, and you’ll skip a step at home.
- Look for meaty cuts with good skin coverage—that’s your ticket to crackle and color.
- If fresh is scarce, place turkey wings in your cart frozen and thaw in the fridge before seasoning.
- Can’t find them? Chicken wings are a handy substitute and often finish faster in the cooker.
- Buy an extra pack for the freezer—great for sudden game-day plans or quick suppers.

“Ask about sourcing—local farms often have meaty, flavorful pieces that cook up real nice.”
Conclusion
That’s a wrap—simple steps, big payoff, and a platter ready to pass. Resting the pieces 5–10 minutes keeps them juicy. When you let wings rest, the juices settle and every bite stays tender.
Saved leftovers re-crisp nicely at 330°F for 4–5 minutes. Pick your vibe—smoky-sweet rub or lemon-pepper butter—both tested and true. These little choices make these recipes crowd-pleasers.
Trust your thermometer, flip once, and cook in rounds if you have a crowd. Use this air fryer turkey method for holidays or quick weeknight feasts. Now go on—serve big, share plenty, and enjoy the smiles.