
You’ll get golden, crackling Vietnamese-style spring rolls in the air fryer using far less oil and zero deep-frying mess. You’ll work with quick-cooking proteins (shrimp, ground pork, tofu), crisp cabbage and carrots, and pliable wrappers for even browning. Preheat briefly, arrange rolls single-layer with gaps, spray lightly, and flip halfway for perfect crunch. Timings vary by size and frozen status. Keep herbs fresh and sauces ready — continue for step-by-step rolling, timing, and sauce ideas today.
Why Choose the Air Fryer for Spring Rolls
Crisping spring rolls in an air fryer gives you golden, crackling skins without the mess of deep-frying, and you’ll get consistent results every time. You’ll love how the appliance uses hot circulating air to create a healthier crunch with far less oil, so you keep texture without excess calories. It heats quickly, so you can cook batches in minutes and adjust time or temperature to suit thickness and filling moisture. The basket design prevents sogginess and encourages even browning, so you don’t babysit trays. Cleanup is simple: nonstick baskets and removable racks rinse or pop in the dishwasher for faster cleanup than pans full of oil. You’ll also save space and skip a greasy scent that lingers in the kitchen. Overall, using an air fryer makes crispy spring rolls more approachable, faster, and tidier, letting you focus on dipping sauces and serving while machine does the heavy lifting.
Ingredient Checklist: Proteins, Veggies, and Wrappers
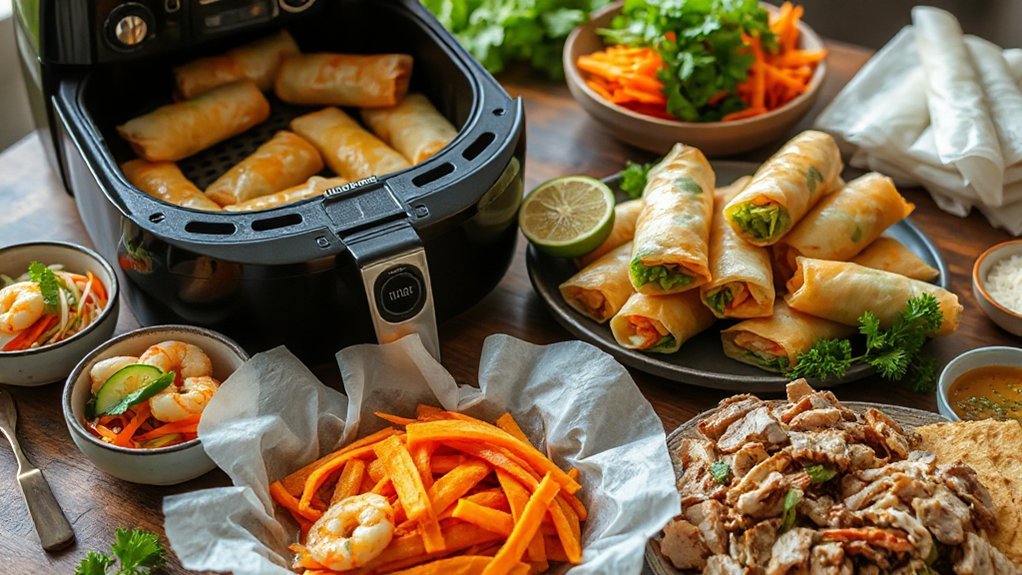
A few smart choices will make your air fryer spring rolls sing: pick a protein that cooks quickly (shrimp, ground pork, chicken, or firm tofu), load up on crisp veggies like cabbage, carrots, and bean sprouts, and use fresh or thawed spring roll wrappers for pliability. You’ll want a firm plan: choose one main protein, one citrusy herb, and two crunchy vegetables. For protein substitutions, swap shrimp for thinly sliced chicken, or tofu for pork when you need a vegetarian option; cooked vermicelli also works if you prefer. Keep fillings dry—pat cooked proteins and squeeze excess moisture from shredded veg to prevent soggy rolls. Explore wrapper varieties: rice paper, wheat-based spring roll sheets, or even egg roll wrappers, noting each browns and crisps differently in the air fryer. Stock basic seasonings—soy, fish sauce, garlic, and a touch of sugar—so you can finish fillings quickly. Measure before you roll.
Step-by-Step Rolling Technique

Start by laying a wrapper on a clean, dry surface with one corner pointing toward you—this gives you control as you build. Place about 2 tablespoons of filling near the corner, keeping a compact mound. Fold the near corner over the filling, then fold both side corners inward to create a neat envelope; that folding sequence prevents leaks. Roll up once tightly, then brush the exposed top edge with a little water. Finish rolling to the far corner, applying firm, even sealing pressure so the wrapper holds during air frying. Keep rolls uniform in size for even cooking and to fit your air fryer basket. If a wrapper tears, patch it with a small dab of water or start a new one. Practice makes quicker, neater rolls—aim for confident, consistent motions. Let them rest briefly to set before spraying or brushing oil. They crisp up beautifully in minutes.
Seasoning and Flavor Tips: Herbs and Sauces
Using fresh herbs brightens the filling and a simple sauce ties everything together, so you’ll want to plan both with the same goal: balance. Pick cilantro, Thai basil, and mint for contrast, chopping them just before filling so they stay lively. For sauces, aim for salty, sweet, sour, and spicy notes — a base of fish sauce or tamari, lime, sugar, and chile works every time. Use Aromatic infusions like toasted garlic oil or scallion oil to wake up the wrapper without adding grease. Add Umami boosters—miso paste, fermented shrimp, or mushroom powder—in small amounts to deepen flavor without overpowering herbs.
- Fresh herb ratios: 2 parts cilantro : 1 part basil : 1 part mint.
- Quick dipping sauce: 2 tbsp fish sauce, 1 tbsp lime, 1 tsp sugar, sliced chile.
- Finish: brush light aromatic oil before rolling for sheen and scent.
Taste as you go; adjust.
Air Fryer Settings and Timing for Perfect Crisp
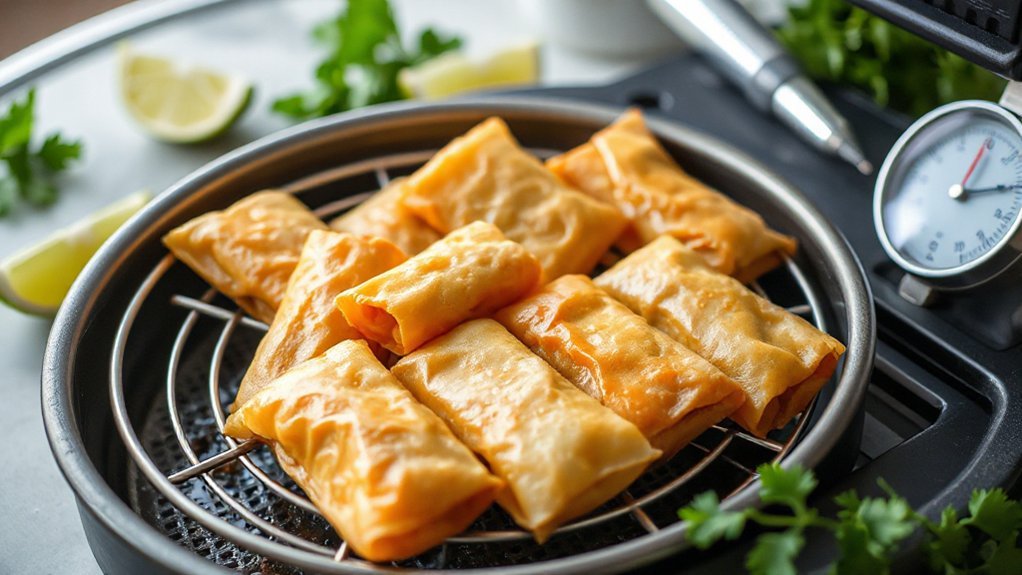
You’ll usually set the air fryer to about 380°F (190°C) and cook spring rolls for roughly 8–12 minutes depending on size. Flip them halfway through so both sides get evenly golden and crisp. Arrange a single layer with space between rolls so hot air can circulate for consistent crunch.
Temperature and Time
While models vary, aim for 375°F (190°C) for 8–12 minutes, flipping once halfway—this gives most spring rolls a reliably crisp, golden finish. You’ll tweak timing based on roll size and filling moisture; thin wrappers need less time, dense packs need more. Remember Thermal Lag in larger baskets: your unit takes a moment to reach set temp, so preheat briefly. Watch the Heat Gradient inside the basket—edges brown faster than center—so arrange rolls with a little space. Use these quick guidelines:
- Small rolls (1 oz): 8–9 minutes at 375°F.
- Medium rolls (2–3 oz): 10–11 minutes at 375°F.
- Large rolls (4+ oz): 12–14 minutes; reduce if wrappers brown too fast.

Adjust by 1–2 minutes rather than big jumps. Trust your eye and taste.
Flip Midway Through
Often the simple act of flipping halfway is what turns good spring rolls into perfectly crisp ones, so plan to open the basket once during the cook and give each roll a quick turn. You’ll set a timer, usually around six to eight minutes total, and at the midpoint use flip tools like silicone-tipped tongs or a thin spatula to turn rolls gently. Look for visual indicators: golden-brown edges, evenly puffed wrappers, and tiny oil glossing. If one side browns faster, rotate that roll into a cooler spot. Work quickly so you don’t lose heat; keep the basket nearby and preheat the air fryer so the second half finishes crisping. Finish with a one to two minute extra blast if needed for uniform color.
Single Layer Cooking
Laying spring rolls in a single layer gives hot air room to circulate, so set your air fryer between 350–400°F and plan for 6–12 minutes depending on whether they’re fresh or frozen. You’ll get Even Browning when you avoid stacking; Crowding Effects trap steam and make them soggy. Arrange rolls with a fingertip gap and check halfway, turning if needed. Use this checklist to dial timing and texture:
- Fresh rolls: 6–8 minutes at 375°F for light crisp.
- Frozen rolls: 10–12 minutes, shake basket at 6 minutes.
- Small batches: monitor 1–2 minutes to adapt for your model.
You’ll learn your fryer’s sweet spot fast and enjoy reliably crisp, golden spring rolls every time. Don’t overcrowd; cook in successive quick batches.
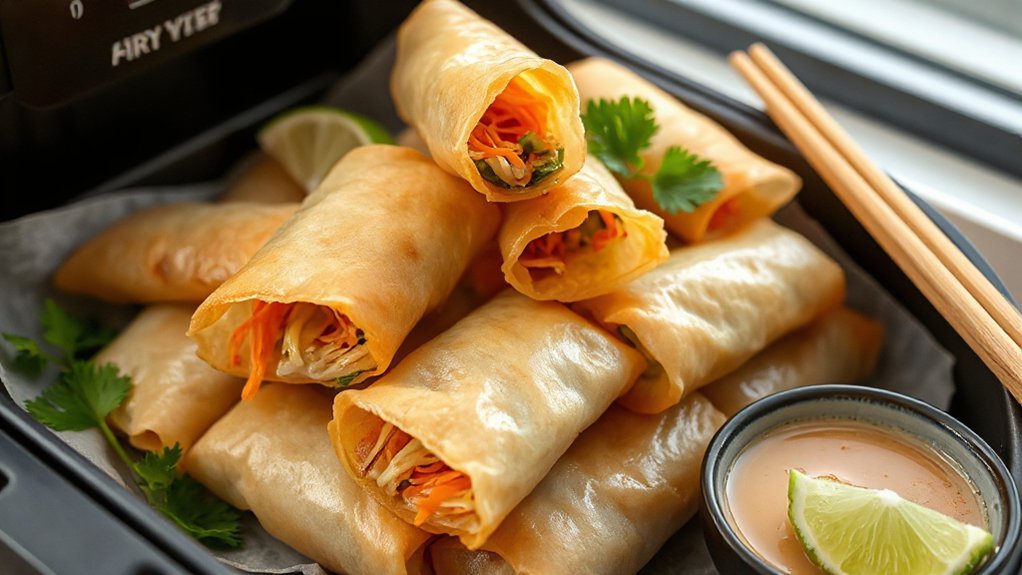
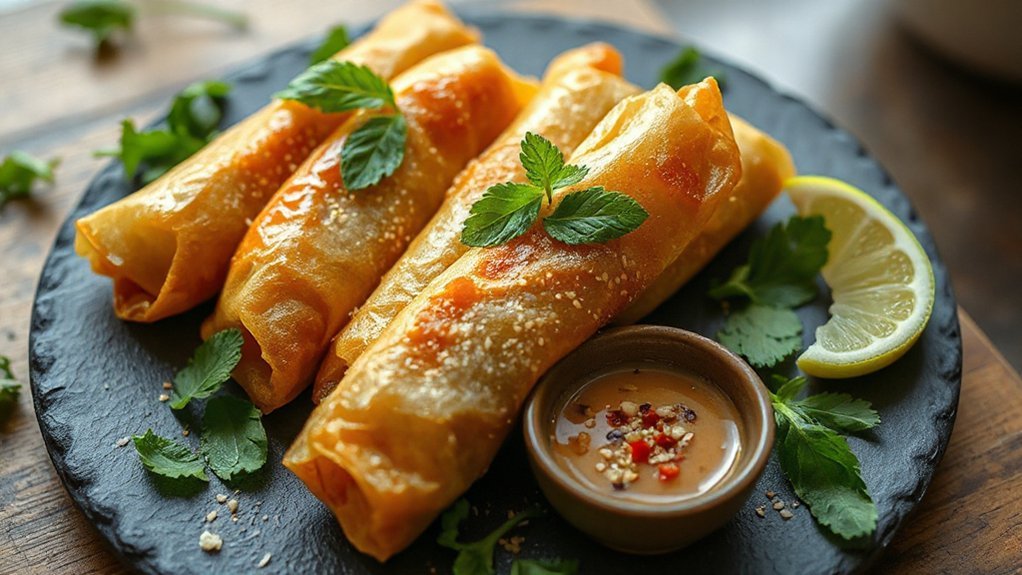
Serving Suggestions and Dipping Sauces
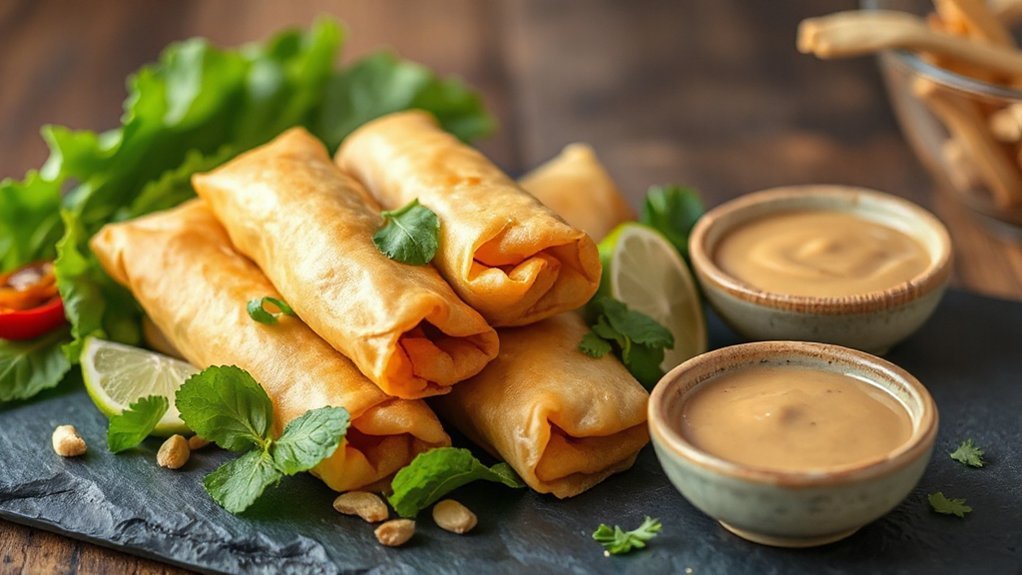
You’ll want two sauces on the table: a tangy classic nuoc cham for brightness and a creamy peanut sauce for richness. Serve the spring rolls hot with small bowls so guests can mix and match flavors. Finish each plate with plenty of fresh herb garnishes—mint, cilantro, and Thai basil—to lift every bite.
Classic Nuoc Cham
A classic nuoc cham brightens air-fried spring rolls and gives you a tangy, balanced counterpoint to the crisp wrapper. You’ll whisk fish sauce, lime, sugar, water and garlic into a lively dressing that highlights the sauce’s cultural significance while keeping an eye on its modest nutritional profile. Use it as a dip, a drizzle, or a light salad dressing to add freshness without heaviness. Adjust sugar and chili to taste; it’s forgiving. Store leftovers refrigerated for a week. Taste as you go and tweak acidity for your preference.
- Quick mix: 2 parts fish sauce, 2 parts water, 1 part lime, sugar to taste.
- Add-ins: chopped chili, shredded carrot, minced garlic.
- Serving: warm rolls, herbs, and rice for contrast. Enjoy every bite.
Creamy Peanut Sauce
Balancing creamy peanut sauce with contrasting textures and flavors makes your air-fried spring rolls sing—try it as a dip, a drizzle, or a quick salad dressing to add richness without overpowering the herbs and crunch. Use roasted or raw peanut varieties to alter flavor; thin with lime water or coconut milk for a pourable consistency. Understand basic emulsion chemistry: whisk oil into paste with acid to stabilize. Serve warm or room temp; offer a chili-lime side for heat. Quick tips: toast peanuts, strain for silkiness, and adjust salt.
| Use | Texture | Pairing |
|---|---|---|
| Classic | Smooth | Nuoc Cham |
| Spicy | Slightly chunky | Rice noodles |
| Drizzle | Thin | Greens |
| Dip | Thick | Spring rolls |
Mix in fish sauce sparingly for umami, or use tamari for gluten-free guests and bold savoriness today.
Fresh Herb Garnishes
Layering bright herbs—cilantro, Thai basil, and mint—over warm air-fried spring rolls adds instant freshness and aroma. You’ll want to pile on herbs and use simple finishing touches: a cilantro lime squeeze brightens each bite, while mint chiffonade scattered across tops keeps things aromatic and clean. Serve the rolls with small bowls of dipping sauces and let guests customize.
- Add a cilantro lime drizzle over a peanut or hoisin dip for zesty contrast.
- Sprinkle mint chiffonade and thinly sliced Thai basil for layered fragrance.
- Offer lime wedges, crushed peanuts, and sliced chili so people can tailor texture and heat.
These easy garnishes lift the dish and keep it light, bright, and ready to share. They’ll make each bite pop with freshness today.
Make-Ahead, Freezing, and Reheating Tips
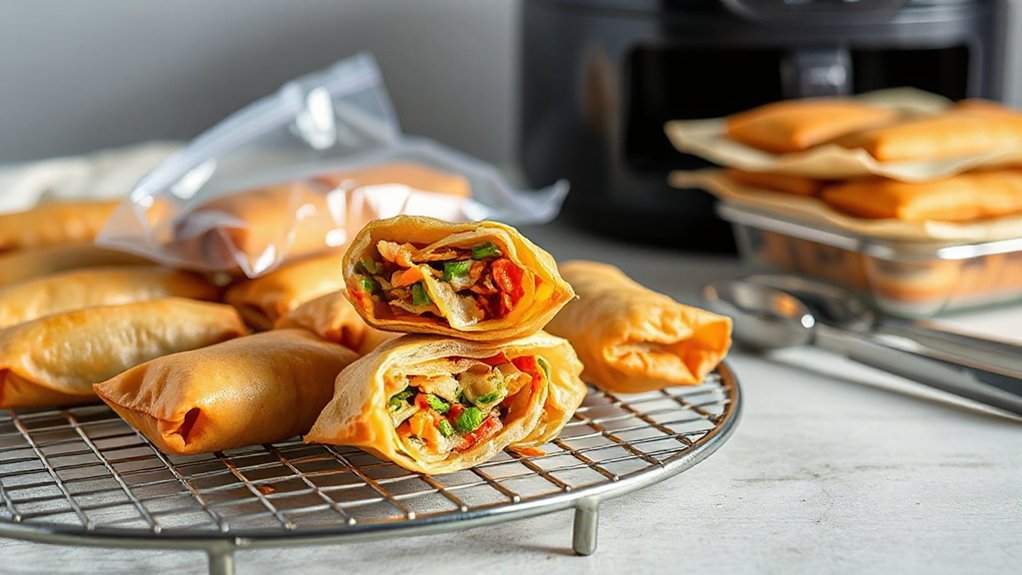
If you want to save time without losing crunch, you can make spring rolls ahead, freeze them, and reheat in the air fryer for nearly fresh results. Plan Portion sizing before wrapping so you freeze the right number per meal — singles for snacks, packs of four for dinner. Flash-freeze on a tray until firm, then transfer to a Vacuum sealing bag or a tight freezer container to prevent freezer burn and sogginess. Label with date; they’re best within three months. To reheat, don’t thaw fully: pop frozen rolls into a preheated air fryer at 375°F (190°C) for 10–12 minutes, flipping halfway, until golden and crisp. If you have larger rolls, add a few minutes. For softer fillings, tent with foil for the first 4 minutes to avoid over-browning. Finish with a quick spray of oil for extra sheen. Reheat only once for food safety and best texture and flavor.
Conclusion
You’ll love how the air fryer makes Vietnamese-style spring rolls lighter and crispier with far less oil — using up to 80% less fat than deep frying. With simple wrappers, fresh herbs, and a quick roll technique you’ll master in minutes, you can serve crunchy, flavorful bites any night. Keep a batch frozen for busy evenings, and pair them with tangy nuoc cham or peanut sauce to keep everyone asking for more — it’s that simple, really.


